Progress 62 OlllO - '62 Wagon

62 OlllO

Well Oiled
Oct 19, 2009
1,821
Georgia
First Name
Kevin
Willys Model
  1. Wagon
Willys Year:
  1. 1962
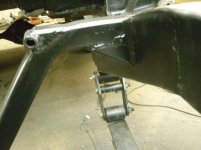
The weather here finally got above 50 and tomorrow I'm looking at 62 degrees. We rolled the Wagon back into the surgery bay to address motor mounts and re-do transmission mount. The tranny mount is time consuming, after many attempts, I still don't have it right, but I'm closer... I wasn't paying much attention to the Transfer Case and drive shaft. I made the mount to bolt to the frame so it can be removed, making the removal of the transmission easier in the future...without pulling the motor. With all this welding you would think I would get better at it, no chance...4 1/2" angle grinder makes me look good! The Dana 300 Twin Stick Transfer Case is heavy, which required the floor jack to level it and the engine while making my engine mounts.
I moved the engine 1 5/8" off center to the right (passenger side) so the Transfer Case and front axle pinion lined up...The front drive shaft should be OK...time will tell - ( I wish Midnightburn was here...) The brains to this build decided we needed additional strength for the frame and in 15 minutes took a 1/4" x 1 3/4" square steel tube, bent it on the muffle bender and welded it in place....and walla... motor mounts appeared before your eyes. We used an old brake line for a pattern, bending it in it's proper place. I still have to add some gussets, but you get the idea.

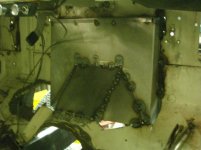
Remember what it used to look like???

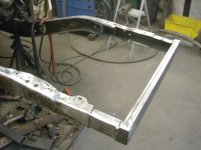
Progress has been slow, my health ( Titanium Rods Fusing Vertebra's in my lower back ) and the weather. Tomorrow after some coxing... my bones/muscles to move, I will attempt at making gussets, weld the cowl replacement steel in and make a template for the new steel floor board...if you are in the area, stop in for a cold one... :beer:[attachment=1:3mz44xs8]Engine Mount 002.jpg[/attachment:3mz44xs8][attachment=0:3mz44xs8]Engine Mount 001.jpg[/attachment:3mz44xs8]
 

Attachments

  • DSCN1505.jpg
    DSCN1505.jpg
    127.6 KB · Views: 1,844
  • DSCN1505.jpg
    DSCN1505.jpg
    127.6 KB · Views: 1,843
  • Engine Mount 002.jpg
    Engine Mount 002.jpg
    131 KB · Views: 1,845
  • Engine Mount 001.jpg
    Engine Mount 001.jpg
    127.1 KB · Views: 1,841
Re: Progress on '62 - Motor Mounts

Wow... That is some beefy support there...
Looking good though
 
Re: Progress on '62 - Motor Mounts

I have some remarkable talented friends and with a Lortab at nighttime, (Modern Medicine in a pill), I have been able to make some progress. As you can tell... I have ADHD and ADD, I jump around from one area to the next without finishing any....good thing for friends.
Today I worked on the gussets for the motor mount, welding and my favorite...grinding ( it's a sit-down job ). Then I turned my attention to the drivers side floor. The floor looks like a puzzle or a patch work quilt...no show Willys here, solid new steel is the objective and I achieved my objective.
My plan is to spray a bed-liner on the floor so seams won't matter. Picture tomorrow...can't show you everything.
[attachment=1:1gdqzvzu]Engine Mount 006.jpg[/attachment:1gdqzvzu][attachment=0:1gdqzvzu]Engine Mount 007.jpg[/attachment:1gdqzvzu]
Seeing the stamp USA reminded me that I also re-stamped my serial number in different spots, just in case there is ever any doubt.
I like theme vehicles and haven't come up with one yet, some ideas please...Smokey the Bear-Forest Service Vehicle,
Wiilys- Mater ( The Movie Cars ), Civil Defense Vehicle.
Savage with those new lights you can work around the clock and new cement....look's like a new creeper should be in the budget. I expect to see some progress from you "Big Guy"!
Moab is my goal, a lot has to happen and it's not all to do with my Willys.
 

Attachments

  • Engine Mount 006.jpg
    Engine Mount 006.jpg
    125.7 KB · Views: 1,803
  • Engine Mount 007.jpg
    Engine Mount 007.jpg
    124.1 KB · Views: 1,802
Re: Progress on '62 - Motor Mounts

Kevin,
You are running a S/B Chevy right?
any clearance issues with the front driveshaft and the mount?
I am still on the fence with if I am gonna do a crossmember engine mount or just do the weld in mounts.....
 
Re: Progress on '62 - Motor Mounts

Eric B said:
Kevin,
You are running a S/B Chevy right?
any clearance issues with the front drive-shaft and the mount?
I am still on the fence with if I am gonna do a crossmember engine mount or just do the weld in mounts.....
My '55 has a SBC and the original drive line. If you need pics from any angle let me know. I did not do it, I bought it this way, but it all clears and the 4x4 works well...
 
Re: Progress on '62 - Motor Mounts

My eye ball and a broom stick did the measuring Eric...and it looked like it would be fine. However your question made me check it, so I jacked the right front tire up 17" and the pinion was still 2 3/4" away from the motor mount. When the vehicle is sit'en on all four's the distance is 4"...I figure that's good enough for me and with 32's the angle will be more drastic and I won't be in the drivers seat...I'm not building this thing for the extreme... I can climb a tree with chains on...I'm leaving that up to Savage.
[attachment=2:2x42su9r]Engine Mount 009.jpg[/attachment:2x42su9r][attachment=1:2x42su9r]Engine Mount 013.jpg[/attachment:2x42su9r][attachment=0:2x42su9r]Engine Mount 014.jpg[/attachment:2x42su9r]
I also set my engine a "tad" forward and as high as I could...I had some extra space after remounting the body with 2 body mounts high and not having that stock brace ( radiator support brace) in the way. I need to take a refresher course and re-read Midnightburns post...he has been my inspiration...however my talents aren't any where at his level. My talented friends are, but you can't over use them to much.
I'm running a SBC, 700R4 Tranny with a Twin Stick Dana 300 Transfer Case...connected to Dana 44 Axles....HeHaaa!!!
 

Attachments

  • Engine Mount 009.jpg
    Engine Mount 009.jpg
    132.8 KB · Views: 1,793
  • Engine Mount 013.jpg
    Engine Mount 013.jpg
    230.1 KB · Views: 1,787
  • Engine Mount 014.jpg
    Engine Mount 014.jpg
    234.8 KB · Views: 1,792
Re: Progress on '62 - Motor Mounts

Kevin,
Sorry to get the wheels in your head turning. I know there are differences between your SBC and my SBF. I got a little time out in the garage today even with it being 20 degrees and snowing (insulated and heated avg. 60 degrees). My current setup has my motor pretty much dead center on the frame giving good clearance on the front drive shaft but kicking a slight angle on the rear drive shaft.

I looked a little closer on my side and figure I am just gonna do my mounts from the frame so that when I put a rear sump oil pan on it's not a huge pain in the arse.

Good work though glad to see you guess on the mount worked out in your favor instead of having to re-do it.....
 
Re: Progress on '62 - Motor Mounts

My friend Dave and myself tinkered with the fire wall, making some more room for the distributor and engine. I don't think I needed any more, but the previous owner beat on the firewall with a slug hammer and as you all know, a stock Willys firewall isn't lacking holes...so it was decided to do some cutting, bending and welding while we watched NASCAR. The opening is 2" deep and 18" wide...I used a tape measure for todays project....eye ball and broom stick are for the "Big Jobs".
[attachment=1:386q5qy0]Engine Mount 015.jpg[/attachment:386q5qy0]
We have a bit more to do with it before it's Officially Finished...but you get the idea.[attachment=0:386q5qy0]Engine Mount 016.jpg[/attachment:386q5qy0]
 

Attachments

  • Engine Mount 015.jpg
    Engine Mount 015.jpg
    125.9 KB · Views: 86
  • Engine Mount 016.jpg
    Engine Mount 016.jpg
    121.4 KB · Views: 87
Re: Progress on '62 - Motor Mounts - Fire Wall

Kevin, how high is the box? I'm going to do the same thing. Also how far from the top to the leading edge of the trans tunnel and width? Thanks Chuck
 
Re: Progress on '62 - Motor Mounts - Fire Wall

I liked the wiggly design in the original firewall so I cut it below that, also it allows me to keep the brace for the dash... then two inches or more if you like, in towards the interior...straight down and you are there....plenty of room...but remember I moved my motor forward a bit so more than two inches might be better. You aren't stealing any space inside so go for it! I believe I went 17" high ( and still had to cut extra off that length , but that will depend on how deep you go as well....I have plenty of room for the transmission (700R4) I cut the extra off and welded it all together. You might find a better way....I tend to Jerry- Rig things so they are "good enough" in my eyes.
 
Re: Progress on '62 - Motor Mounts - Fire Wall

I like post's that include pictures, so here is one for your viewing pleasure...Shock Mount Bracket came from an Isuzu 1 ton, nothing fancy. Remember you can click on the picture to make it full screen.

[attachment=0:1z0jawzl]Engine Mount 019.jpg[/attachment:1z0jawzl]

The bright colors are a tribute to a friend of mine who recently passed away...he had a '55 Chevy that was tricked out and all his suspension was different bright colors on a black Car & Frame...it made the components really stand out plus made people smile.
My transfer case and tranny will be safety orange...axle safety red...I need something purple too.
 

Attachments

  • Engine Mount 019.jpg
    Engine Mount 019.jpg
    138.5 KB · Views: 79
Re: Progress on '62 - REAR SUSPENSION

I NEED A NAME FOR MY WILLS WAGON....example...Willys-Mator or Ace Flying Service...help me out for a theme.

Now for the progress...things I learned today: 1.) Wear Work Gloves when using cutting torch or helping, I put my bare hand down on a "hot one" 2.) While using the gas torch, if you see smoke there is fire - while cutting the bolts/nuts off the PO seat belts, a dirt rag was inside ( on top of where we where at ) smoke gets my attention.

Out with the old rear springs and axle. I can't wait for the axles to be in place and the Willys is rolling on new suspension, axles, brakes, tires, shocks etc.
[attachment=2:1f83c53z]Rear Suspension 003.jpg[/attachment:1f83c53z]
I made my spring perches out of a 4" square 1/4" thick steel tube...I used the small bit to drill two pilot hols so things line up
[attachment=1:1f83c53z]Rear Suspension 002.jpg[/attachment:1f83c53z]
I wasn't excited about the PO stick welding, but I can make it look better. I marked center ( for the axle center) on the frame using the two holes in the frame from the original bump stops as a refrence, new stops in the plans.
[attachment=0:1f83c53z]Rear Suspension 006.jpg[/attachment:1f83c53z]

The axle will be painted safety red to match the front and the springs will be satin black.

It was a great day, sunny 60+ degree...my friend Perry was a "hoot" of a helper...he works for cold :beer: and he can put :beer: away as well.
 

Attachments

  • Rear Suspension 003.jpg
    Rear Suspension 003.jpg
    140.6 KB · Views: 57
  • Rear Suspension 002.jpg
    Rear Suspension 002.jpg
    232.7 KB · Views: 56
  • Rear Suspension 006.jpg
    Rear Suspension 006.jpg
    230.8 KB · Views: 55
Re: Progress 62 OlllO - REAR SUSPENSION

NAME:
"Rollin Rainbow"

"Skittles"

"Splash 'O' Color"

"Wonder Wagon"

"Confuzed"

"Color Blinded"

Otherwise looking good.
I will shoot you the price on that tank upgrade too.

Eric
 
Re: Progress 62 OlllO - REAR SUSPENSION

RainBlow Express: We're Humpin to Please

Kevin's Kevinator

Kevin's Keggerator: Red axles, White driver and Pabst Blue Ribbion Beer

OK's Willys (Old Kevin's)
 
Re: Progress 62 OlllO - REAR SUSPENSION

I'll have to pass on Rainblow Express...I'd be the Pide-Piper headed to Moab, and you wouldn't like what was following me... it won't be blue smoke...perhaps a trail of KY.

I like Skittles, Keggerator, Confused-Color Blind...KEEP THEM COMING...perhaps Pete should have a contest...Name 62 OlllO Wagon...Theme will be painted on each Door!........ the underside of the Wagons back floor could have another unique theme for those on their back looking under the Willys....I like surprises.

After church...we might do some grinding and cleaning up the old frame. I need to buy a pair of cover-all's...with a bad back I do a lot of crawling, laying down type work...it's to hard getting up and down, up and down...my blue-jeans get rather dirty and jacket.
 
Re: Progress 62 OlllO - REAR SUSPENSION

Today was a lazy day, I felt some additional steel was needed on the front spring mount for the rear. It was great to have a sit down job. When we weld the mount onto the existing frame, I will add two gussets to the mount to really lock it in place.[attachment=1:16wdvwma]Rear Suspension 009.jpg[/attachment:16wdvwma][attachment=0:16wdvwma]Rear Suspension 010.jpg[/attachment:16wdvwma]

I like to fabricate, but have a hard time duplicating, I tend to get in a hurry, but these look good from five feet, if you get closer, squint your eyes they look like I bought them.
 

Attachments

  • Rear Suspension 009.jpg
    Rear Suspension 009.jpg
    136 KB · Views: 46
  • Rear Suspension 010.jpg
    Rear Suspension 010.jpg
    129.6 KB · Views: 48
Back
Top