My '59 Project

Davidgreen59

Precision Fit
All-Star
Jun 2, 2019
806
Arizona
First Name
David
Willys Model
  1. Pickup
Willys Year:
  1. 1959
I’m starting this thread so I can ask questions and record stuff as I go. I can’t really call this a “build thread”, as you’ll learn if you follow this a bit. My 59 pickup 226 4wd, has been in our family since maybe 75. I drove it, rebuilt the engine, and, I’m sure, cobbed a few things when I was younger. I managed to get the engine running after it sat for years, and maybe I’ll post that stuff soon. But now I have it running, I need to get it “stopping”.
My plan is a full brake replacement: master and wheel cylinders, hoses, springs, shoes, lines and fittings.
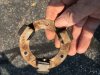
Before I launch into that, though, I replaced the horn button. Here are the old rubber bumpers. They were more like styrofoam than new. One of those in the pic has already been replaced. After I cleaned the ring up, replaced the other bumpers, cleaned the old pins up, and snapped on the new button, I have this.
Looks a little funny, this new shiny thing in that cab, but I’m going with it. Laugh if you want

more to come in brakes in a bit
F44A4812-9BA4-433F-B03C-010315D42B7F.jpeg
 

Attachments

  • 0DCE379F-07A0-4695-85B4-072B7D3C6B53.jpeg
    0DCE379F-07A0-4695-85B4-072B7D3C6B53.jpeg
    108.4 KB · Views: 94
When I started my brakes, things looked like this (after a little cleaning2080CB96-82FB-4BA7-AE98-FDF8DC7CAF35.jpeg
Then after soaking the backers in Dawn and blasting ( I found a sandblaster in the garage), putting in the new wheel cylinder and shoes, I’m up to here. (Just waiting for new springs to arriveimage.jpg
 
Last thing for tonight:
Since I got both fronts to the same spot, and I won’t get some of the parts I need for another 5 days, I have to jump around a bit to maximize my time

when I got the engine running, I ran it at various times, up to maybe 20 min. The whole time, I could never see any flow or turbulence in the radiator fill hole. Then, the temp gauge started to spike, even though I had an infrared temp gun telling me that nowhere on the block was it super hot.
So I got a new thermostat as a gift, and went to swap it out, as a pretty good guess (it was probably 30 years old anyway.
this is what I found 565CECAC-7AD7-4453-A480-1847690E6920.jpegNot as bad as I expected. I took this and set it in water with my moms candy thermometer, and it started to open right at 160. I ran it twice, same. This next pic is the new 180, (top) and the old 160. Temp is right on 200. BAB3BB26-4E26-4778-B7BA-577FC362AA26.jpeg
They both look liike they’d flow the same.
so here’s a question: on the 226, shouldn’t I see flow or turbulence with the radiator cap off if the stat is open?

it could be my sending unit is bad, or the wires or gauge are crapped, but I’d hate to fry an engine I just brought back from the dead.
 
The temp gauge started to spike — can you describe that in more detail? What is it showing? Does it level out at some point or just keep climbing?

The flow will be the same with either thermostat past the opening temperature.

Normally you would see some movement of the coolant at operating temperature, though it is usually low key.

Can you use your mother’s thermometer to check the temp of the radiator water when it’s running?

Have you flushed out the system since you got it running? What was it like when the old coolant was drained?
 
Looks a little funny, this new shiny thing in that cab, but I’m going with it. Laugh if you want

Ok, I'm laughing!

Just kidding. My first Willys, (way back when) for some reason the 1st thing I had to restore was the glove compartment! Probably because I didn't know a screwdriver from a wrench back then. Looks like you are doing fine.
 
OK, so you've verified that one of the thermostats opens at 160. So install that thermostat and fill the cooling system completely. Start the engine from cold and monitor the top radiator hose with your hand (keep fingers out of the fan). When you just start to feel the hose go hot, look at the gauge. That's 160 by your gauge which should be to the cool side of the center mark. It's entirely possible that your gauge is reading high/low. No matter, now you now where 160 is on your particular gauge. In normal driving, the gauge should stay pretty close to the point where the thermostat opened. If the temp continues to climb, you have an efficiency issue with your radiator which should be addressed. If the engine stays steady, replace the 160 with something more reasonable (if the radiator can keep the engine at 160, it can easily keep it at 195).

If you decide the gauge is reading way off, try a new sending unit. Just don't replace the sender and the thermostat at the same time, so you can track what changes.

FWIW a lot of the current 54mm thermostats don't flow particularly well for whatever reason. I've had good luck with the Robershaw style https://www.amazon.com/Mr-Gasket-43...hermostat&qid=1570897951&s=automotive&sr=1-20
 
The glove box is on my list! Ha. The horn button was a gift, so in it goes. I still have the old original one, in case I want to go back to original.
The temp gauge would peg to hot. I figured it is the sender or the wiring, or the gauge, but with a 30 year old stat, I figured I’d start there. It just didn’t seem to have much if any flow in the upper radiator hose.
I have not flushed the system, but the coolant in it seemed ok, really green, and pretty clean looking. My dad changed it before it got parked the last time.
I’ll put in the new stat, change the heater hoses (they need it bad), and see if I can find new radiator hoses in town, and go from there.
 
A slow day so far. I got the new heater hose in, and the thermostat installed. I’ll have to return the radiator hoses I got from Napa, not even close. The existing hoses are barely ok, and that will have to wait. I’ll fill it with coolant and start it up later today or tomorrow.
On the brakes, I got the master cylinder out. There’s a bit of play in the linkages, but that will also have to go on a list. The cylinder had about a tablespoon of fluid in the bore. That one was replaced a while back, but my Dad could never get a seal in the system for some reason. It never even saw the road, and now it’s on the trash pile. I hope I have better luck.

Is this the right way that the brake line is supposed to be routed? Seems kludged somehow the way it goes around the steering column. 55256418-C927-4C80-887D-7DD71239E3C5.jpegAnd yes, that’s a compression fitting on the brake line. I forget why he did that, and didn’t ask my opinion first. It’s one of the reasons all new steel lines are going in. l also got the bolt off the little “T” fitting by the passenger wheel well. That had me worried, cause I need to reuse that since I couldn’t find any source for replacement.
 
David - WRT Thermostat. Many, if not all, newer thermostats need to have a small hole drilled to ensure that an insulating air pocket doesn't form under it which would keep it closed. Most likely to happen when changing fluid. It happened to me and a 1/8 drill hole was the solution. Here is a discussion about it on the G503 forum.
https://forums.g503.com/viewtopic.php?t=260703

On a side note there is a reasonable theory that 180 is better anyway. Helps ensure the engine gets warm enough to evaporate the water in the oil which causes sludge and if you have a heater, it helps there too.

Cheers, Doug
 
Last edited:
Oh man, I wish I’d seen that thread before I goy everything bolted back up! Shoot, good thing I ordered 2 gaskets :)
I put the new 180 degree in, cause someday I’ll get my heater motor fixed.

I’ll read that thread tonight. Thanks a lot!
 
So I switched to the back wheels, just to keep moving. I hate waiting for parts, but I’ve got another few days before I get the second half of the shipment. I’d prefer to be a little more orderly, but procrastination on ordering did me no favors.
I returned the bogus radiator hoses, and while I was there, I borrowed their big puller. I wish I had the right tool to remove the rear drums, but this works. I flip the lug nuts over and just go slow. 15501A9E-EAB1-4A40-B3BA-0127E53D1694.jpeg
This seems to work for me. I really wanted to see if I could get that pesky parking brake keeper out, so that I can pull the backing plates to clean, blast, and paint. Last time, I could not get it to work. This time, with some baling wire and persuasion, I win!
DC6EB593-5DE0-4B30-944C-6B3ABAEE9046.jpeg
Tomorrow I’ll get the other, set them to soak in Dawn dishwasher solution, and get them blasted and painted. ( ok, all that might take a couple days)
 
I am really surprised that puller worked. Were the drums hard to pull? If not check for cracks in the keyway and hub.
 
The first time I pulled the rears this past spring (on my get it started or kill it trying trip), yea, they were pretty tight on there. Lost of patience, rotating the puller, and vibration, I was able to get this to work. Since I knew I’d be doing this again, and the truck goes nowhere , I didn’t crank the hub bolts down as hard as they need to be, so this time, a little easier.
BTW, how do the disclaimers on this site work? Obviously no one should really follow my methods. Maybe I need to be more clear on that.
I’ll check the keyway and hubs again closer. These are getting new drums, so I’ll ask the machine shop to check the hubs also. They may spot something I missed

Carter, Maybe someone will give me the right puller for a gift (I got a thermostat that way!)
And good reminder, thanks, on the eye protection. To easy to skip, “just for a sec”. One benefit of getting older is that I wear glasses more, so that gives me some minimal amount for most of my regular wrench stuff
 
Keep a watch on eBay,you can pick up a hub puller a lot cheaper at times. They will normally go for $100 and up for a decent made in USA model. I'd steer clear of those suspect Chinese ones. Jmho.
 
The HD hub pullers are about 3x-4x heavier than the one you used. The arms are held on with the lug nuts. Then you tighten the center screw tight and whack the end with a sledge hammer. I had a very good one that I sold on eBay a few years back for $165.
 
This morning I pulled the thermostat gooseneck back off, and took Doug’s advice and drilled a little bypass hole. I am so glad I ordered 2 gaskets! Turned out looking like this the hole is at about 9 o’clock
0E6604F9-DD7F-4E99-8D6D-9668AE7A6FB5.jpeg
After I got all that back together, I got down to cleaning up my driver rear backing plate and the hub that will go on the new drum I have in the living room. They turned out ok, real slow, cause my compressors not made for blasting, and it needs a lot of rest. 5 min work out of 20. The remainder is sitting around.

I think these are close enough to done to paint, and get back on.
ED6CFB7D-F060-4AAB-B0C5-4DBDB4D1AC93.jpeg

One last thing for this morning. When I took the backing plate off, I found this steel shim at the bearing. Looks like it’s had a hard life, is super thin, but back in it goes in. I’m pretty sure the axles are beyond my abilities, but only time will tell. 9E9658A1-7D5C-49AA-8B44-DEB10ECA0BAC.jpeg
 
This morning I pulled the thermostat gooseneck back off, and took Doug’s advice and drilled a little bypass hole. I am so glad I ordered 2 gaskets! Turned out looking like this the hole is at about 9 o’clock
View attachment 63264
After I got all that back together, I got down to cleaning up my driver rear backing plate and the hub that will go on the new drum I have in the living room. They turned out ok, real slow, cause my compressors not made for blasting, and it needs a lot of rest. 5 min work out of 20. The remainder is sitting around.

I think these are close enough to done to paint, and get back on.
View attachment 63265

One last thing for this morning. When I took the backing plate off, I found this steel shim at the bearing. Looks like it’s had a hard life, is super thin, but back in it goes in. I’m pretty sure the axles are beyond my abilities, but only time will tell. View attachment 63266
That 'shim' is actually a grease seal and are available at some of the parts vendors on our forum. You might wanna look into new parts while you have it torn down this far.
https://www.kaiserwillys.com/rear-a...ket-fits-46-71-jeep-willys-with-dana-41-44-53
 
Last edited:
That 'shim' is actually a grease seal and are available at some of the parts vendors on our forum. You might wanna look into new parts while you have it torn down this far.
https://www.kaiserwillys.com/rear-a...ket-fits-46-71-jeep-willys-with-dana-41-44-53

Yes, one of the gaskets for the grease seal.
David, Kaiser-Willys has a lot of helpful diagrams that correspond to their parts catalog. They're helpful whether you're ordering parts or not.
https://www.kaiserwillys.com/diagra...ear-axle-view-2/dana-41-44-53-23-27-rear-axle
 
Back
Top