1963 230_OHC Wagon "Daisy"

I have two blankets like yours. Never got that far. So now they hang as sunblocks on the porch. Keep on. Yours is a great build.
Thanks for the positive thoughts. It's been a rough summer and fall has not been better but taking it one day at a time. Progress is progress any forward movement is one thing closer to getting this on the road.

Only got 45 minutes on this today so kinda feel scattered on the technical side. I've been planing this part since like May. So I have some idea of what I wanted to accomplish.

Then not sure anyone else caught it but I actually saw a episode of something tonight on Motor Trend it was like a '53 Chevy and they used the similar blankets for their seat covers.

They used one for each of the bottom and separate ones for the backs or atleast parts of them for the sections and glued them to the seats. I don't think I can commit to gluing these, that might be a mistake.

Those seats are very similar to wagon seats as it was a 2DR and folder forward per side.

It also had some cool patina work done using some Boiled Linseed Oil, Mineral Spirits in a 3:1 ratio with a few Oz of Penatrating Oil, going to try that an old 1976 Garden Tractor then maybe that would work for the Wagon, who knows.

I forgot he washed it with brillo SOS soaped pads, or the gray scotchbrite, or 0000 steel wool. It came out pretty slick.

So who knows maybe I need to look at that seat method.

On the Boiled Linseed Oil, I feel it can be kinda sketchy, I'm pretty certain that's what I read one time that destroyed part of Reggie Jackons car collection in a big fire, there were used rags with BLO tossed in the trash and they self combusted somehow. I do have one of those triangle fire cans for rags like that.

Follow me for more ways to be distracted....
 
Looking forward to your blanket cover project. I've got the blankets and the grommets (lucky to have a tool left over from snap repair on boat covers) but still wondering about the process. Was the Motor Trend thing a vid on YouTube?
My thought was to use grommets on the edges and then lace the covers on with black shock cord.
 
Looks like it was Road Worthy Rescues, it was a '51 Chevy, close enough, Season 1 Episode 2.


They did the spray glue and fold.

My one friend, his wife is like an expert level 1000 quilter, she offered to help of course in true fashion I said no, but that offer still stands if I need some help on the fit and finish of these things.

The mid seat taco deal I did there is really nothing to tie it back too, so I might have to resort to a bottom blanket and an back blanket.

They broke apart the back and bottom and covered them in different colors.

It was a neat episode, they got alot more done in 43 minutes then I did :)
There is a dude on YooToob by the name of Chechaflo that has some FANTASTIC vids on car upholstery. Be worth watching even if paying someone else to do the work. Also, I have the original FC seats, with horrible looking but ok condition 1970's vinyl...I wanted more comfortable, modern cushioning on the old spring frames, and wasn't sure how to go about it. Found the following vid, and although the guys a bit rambunctious with the knife, it laid down a good direction for me to go. In Spanish, but show me is solid if your Spanish is not. Shows how to tie down what your doing with zip ties. You can make a needle out of welding rod by sharpening one end, heating the other, hammering it flat, and drilling the eye. Or just find a upholstery supplier.
 
There is a dude on YooToob by the name of Chechaflo that has some FANTASTIC vids on car upholstery. Be worth watching even if paying someone else to do the work. Also, I have the original FC seats, with horrible looking but ok condition 1970's vinyl...I wanted more comfortable, modern cushioning on the old spring frames, and wasn't sure how to go about it. Found the following vid, and although the guys a bit rambunctious with the knife, it laid down a good direction for me to go. In Spanish, but show me is solid if your Spanish is not. Shows how to tie down what your doing with zip ties. You can make a needle out of welding rod by sharpening one end, heating the other, hammering it flat, and drilling the eye. Or just find a upholstery supplier.
Looks cool, will check that out.
 
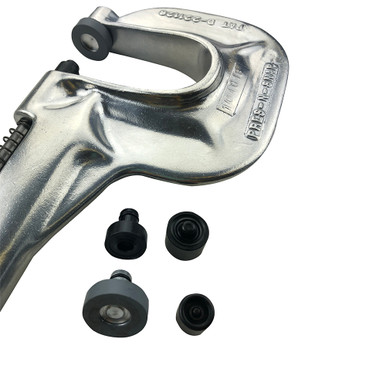
Just a little plug for my brother's business. 40years ago out sailing a grommet pulled out of his sail. He decided there had to be a better way than the old hammer and dies. So he designed a tool to put snaps and grommets in one handed. Available at Amazon and other Fine Retailers. ;)
Pres N Snap.
ScreenShot2021-03-20at10.58.37AM_small@3x.png


Last edited:
Just a little plug for my brother's business. 40years ago out sailing a grommet pulled out of his sail. He decided there had to be a better way than the old hammer and dies. So he designed a tool to put snaps and grommets in one handed. Available at Amazon and other Fine Retailers. ;)
Pres N Snap.
ScreenShot2021-03-20at10.58.37AM_small@3x.png


Great looking tool will order one up.

Might not work the the very middle of these parts bit all the more reason to design around the tools sometimes.

I will say it was kinda a pain to deal with the whole dies, but as with anything you get into a rhythm for sure.
 
Just a little plug for my brother's business. 40years ago out sailing a grommet pulled out of his sail. He decided there had to be a better way than the old hammer and dies. So he designed a tool to put snaps and grommets in one handed. Available at Amazon and other Fine Retailers. ;)
Pres N Snap.
ScreenShot2021-03-20at10.58.37AM_small@3x.png


So genius runs in your family….
 
Just a little plug for my brother's business. 40years ago out sailing a grommet pulled out of his sail. He decided there had to be a better way than the old hammer and dies. So he designed a tool to put snaps and grommets in one handed. Available at Amazon and other Fine Retailers. ;)
Pres N Snap.
ScreenShot2021-03-20at10.58.37AM_small@3x.png


Ordered up should have next week.

That of course sent me down a rabbit hole of possibly using snaps and not eyelets for some of this, so I tossed some of those in the cart, and picked up.a removal tool.

Maybe using snaps would be better then doing the sewing of panels. I think folding the corners and doing a snap set up might work.
 
So genius runs in your family….
I got my Southbend Lathe from him when he went all CNC in his Shop down in Temecula. My older Brother Chick was almost 30 years older than me. My Father was 50 when I was born. Chick served with the 8Th Army Air Corps in England during WW2 as a B17 Mechanic. Some of the stories he told about B17's coming in all shot up. Missing tails and half of the wings, and 2 out of 4 engines not running. Those were amazing airplanes. I think the Germans could shoot down a B24 Liberator with a BB Gun.
 
Looks like it was Road Worthy Rescues, it was a '51 Chevy, close enough, Season 1 Episode 2.


They did the spray glue and fold.

My one friend, his wife is like an expert level 1000 quilter, she offered to help of course in true fashion I said no, but that offer still stands if I need some help on the fit and finish of these things.

The mid seat taco deal I did there is really nothing to tie it back too, so I might have to resort to a bottom blanket and an back blanket.

They broke apart the back and bottom and covered them in different colors.

It was a neat episode, they got alot more done in 43 minutes then I did :)

43 minutes is what it takes me to debate on what to do sometimes!

In all seriousness, it's a sharp Wagon and I know it'll be made more rad by those seat covers.
 
Just a little plug for my brother's business. 40years ago out sailing a grommet pulled out of his sail. He decided there had to be a better way than the old hammer and dies. So he designed a tool to put snaps and grommets in one handed. Available at Amazon and other Fine Retailers. ;)
Pres N Snap.
ScreenShot2021-03-20at10.58.37AM_small@3x.png


Hah! I have one of those, use it all the time. Mine isn't as shiny, and I should replace the little rubber holders but still does the job. Small world...
 
Hah! I have one of those, use it all the time. Mine isn't as shiny, and I should replace the little rubber holders but still does the job. Small world...
My brother passed a couple year ago. (RIP) But his Widow, Son, Daughter in law and two Grandsons still run the business In Temecula, So Cal.
He told me once that he thought the market would be saturated in 10 years. At first he only sold to Upholstery shops. Now Harly Davidson uses them on their saddle bags, Boeing Aircraft uses them on their seats, and you can even get them from Amazon. After the patent ran out, China Corp tried to copy it but they all broke and fell apart.
 
Last edited:
Not much wrenching but had some time to work on a Project Status Sheet of sorts.

I kinda liked the format, so I modified a blank copy and will probably make it into a PDF form that can be filled out on a tablet.

Also good for prospective projects looking to purchase.

The idea on the blank is to check the white box between the colors.

Green= good to go
Yellow= parts rebuilt ready for install
Orange= have parts/ need to rework
Red= no go, need parts or parts are just no good.

I think there is like a service form the dealers use that is similar to this thing. For sure not a unique idea here, but it helps me figure would share the idea.

Without getting super fancy like numbers would equal a color formula. It should work.
 

Attachments

  • 1963 Project Status 11_17 (1).pdf
    341.4 KB · Views: 21
  • Project Status.pdf
    112.5 KB · Views: 12
Not much wrenching but had some time to work on a Project Status Sheet of sorts.

I kinda liked the format, so I modified a blank copy and will probably make it into a PDF form that can be filled out on a tablet.

Also good for prospective projects looking to purchase.

The idea on the blank is to check the white box between the colors.

Green= good to go
Yellow= parts rebuilt ready for install
Orange= have parts/ need to rework
Red= no go, need parts or parts are just no good.

I think there is like a service form the dealers use that is similar to this thing. For sure not a unique idea here, but it helps me figure would share the idea.

Without getting super fancy like numbers would equal a color formula. It should work.
Hmmmm, with your color coding, my Red Wagon name has new meaning.
 
Hmmmm, with your color coding, my Red Wagon name has new meaning.
Yeah it's a love hate kind of list...... it can really create more project stress. Kinda why I buried this in my build thread.

It's something that I can kinda walk thru where I am and what I think I'm going to do next.

Need to add some rolling shelves for parts in the garage. Need to work on small projects weekly to have a chance of finishing.
 
Pretty impressive organization there, Tim!
Thanks, one take away was thr steering box stuff, right now I have the Trans and Bell Housing out, would be ideal to grab the steering box and do that now.

That is a good bench project kind of thing.

And who knows it might just need a good clean up.

That kinda of stood out as a big red area.
 
I like your Project Status Sheet. I think I will try it out. I can see taking my paper to do lists and transferring the info onto the project status sheet. Then I could throw away the dirty messy to do lists. I make a spread sheet to track costs. I could see adding columns for budget and cost.
 
Back
Top