1932 Willys 6-90

Master Marcus, you Sir are a glutton for self punishment! But the end product is (&will be) absolutely amazing. Wish I had a 100th of you skills.
Thank you Les. Not sure why I take on things like this, but I sure hope it works out alright, otherwise I will have to start again!
 
Not sure why I take on things like this, but I sure hope it works out alright, otherwise I will have to start again!
Because you like the challenge, the ability to successfully express your artistic abilities and creativity, the fact that you enjoy doing it and doing it at a superior level, and, in this case, for your wonderful wife.
 
Because you like the challenge, the ability to successfully express your artistic abilities and creativity, the fact that you enjoy doing it and doing it at a superior level, and, in this case, for your wonderful wife.
I see blah, blah, blah, blah....wife. That one word explains the motivation.
 
1932Willys97.jpg

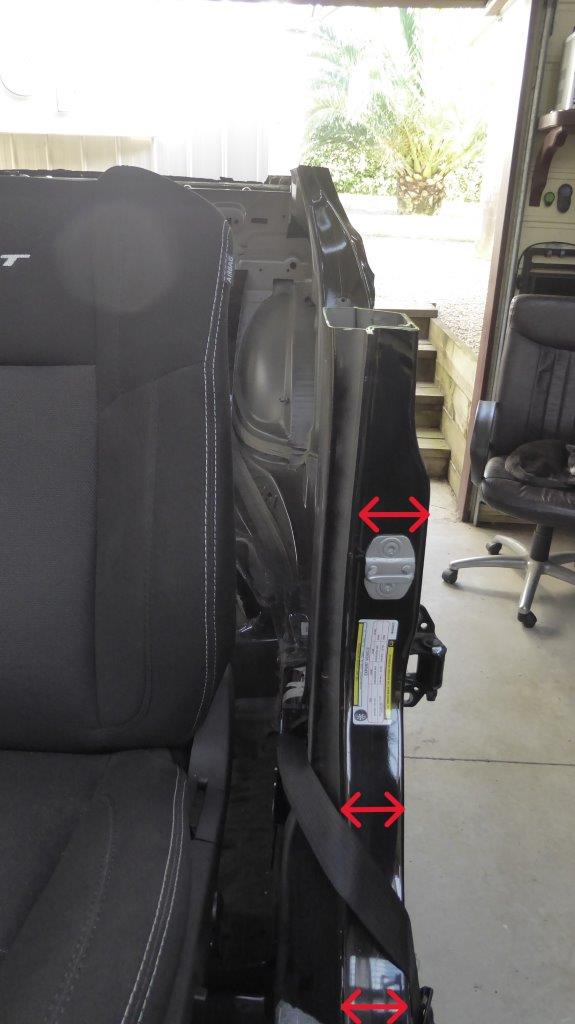
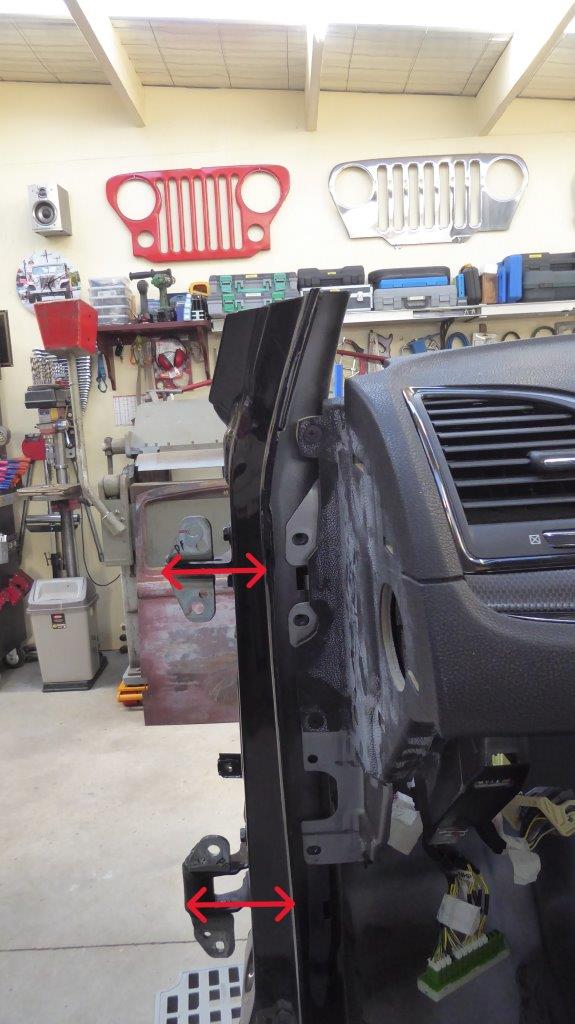
Having determined that the doors can be closer inwards once narrowed, the outer part of the body has to come off. The arrows show how much is going to be removed from the pinch weld outwards.

1932Willys98.jpg

Also on the A pillar just how far the donor doors metal inner frame sticks out from the side of the pinch weld.

1932Willys99.jpg

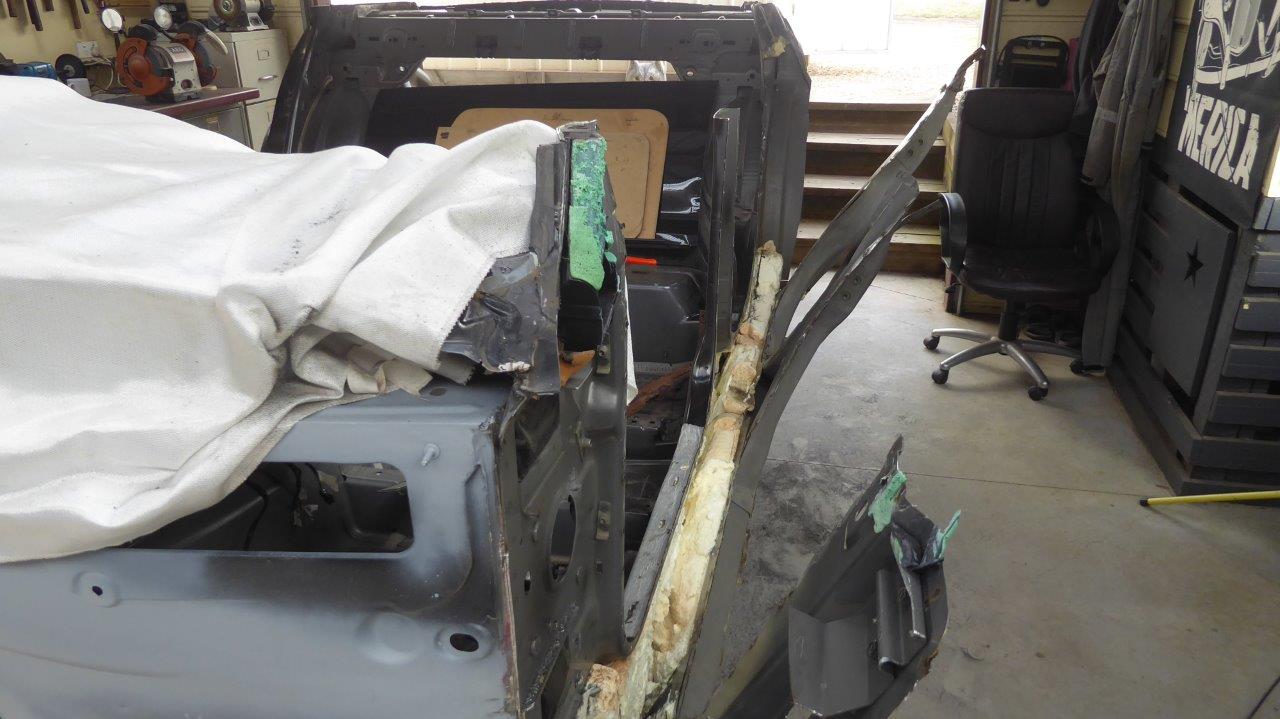
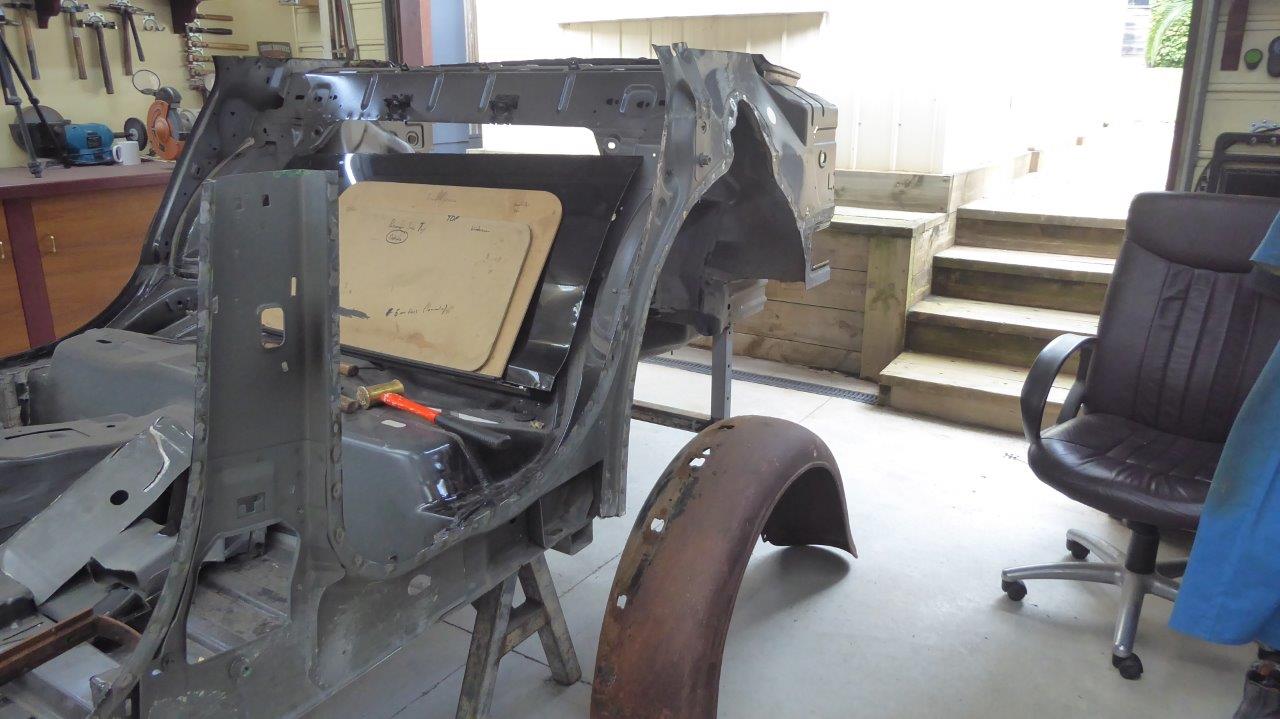
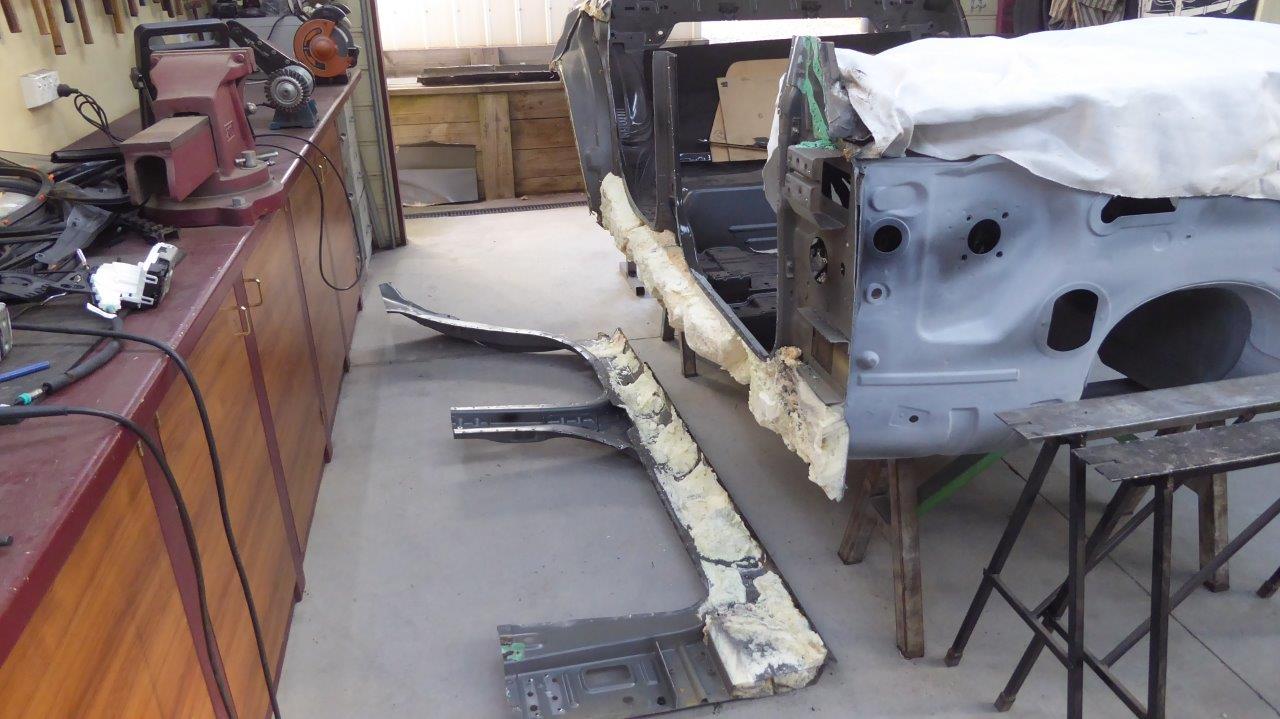
So Elvira is having some major liposuction done to her waistline!

1932Willys100.jpg

Everything was removed from the firewall all the way to behind the rear wheel arch. Even held up one of the Willys guards to see how it all looked.

1932Willys101.jpg

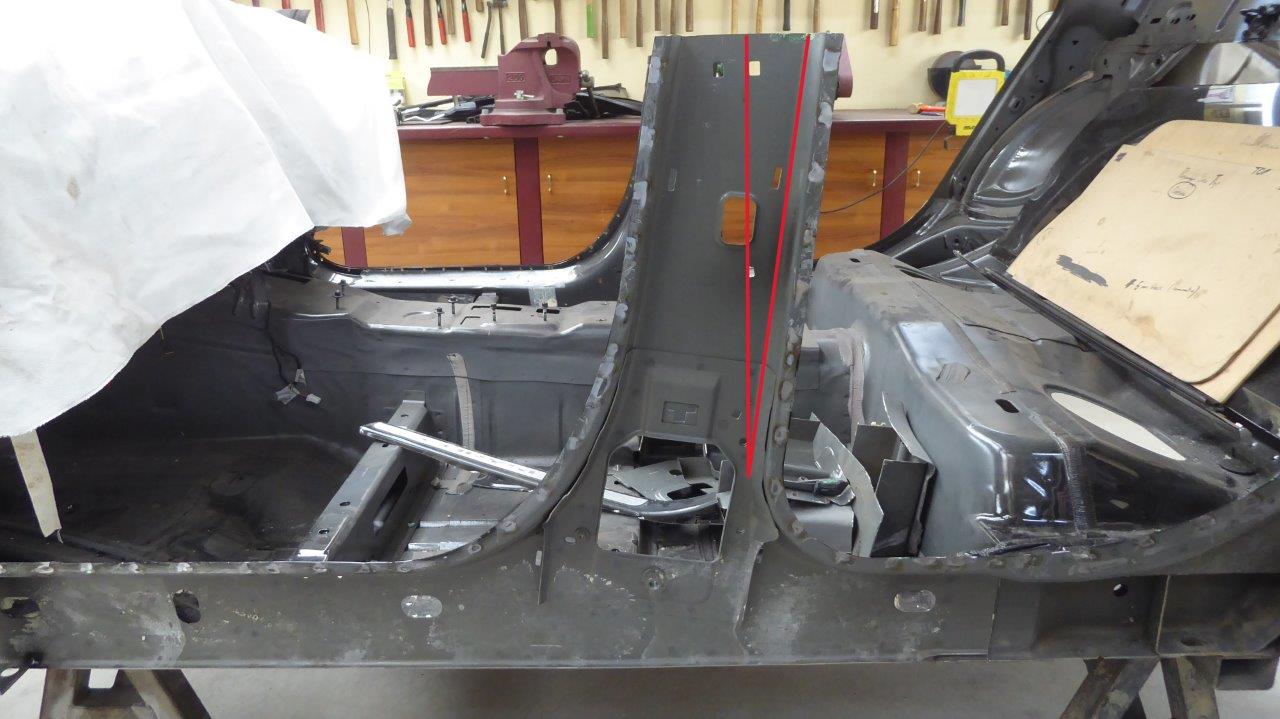
One of the problems I face is how much the B pillars angle back from 90 degrees compared to the Willys doors. Just like the window tracks, this has to be angled forward to vertical, as leaning the window frame backwards at the B pillar was never done back then. A customising trick was to actually lean them forwards, so this would be a step in the wrong direction leaving them like this. I was hoping just to angle the top half behind the window frame vertically, but then the seat belt inertia reel mount would be at the wrong angle.

1932Willys102.jpg

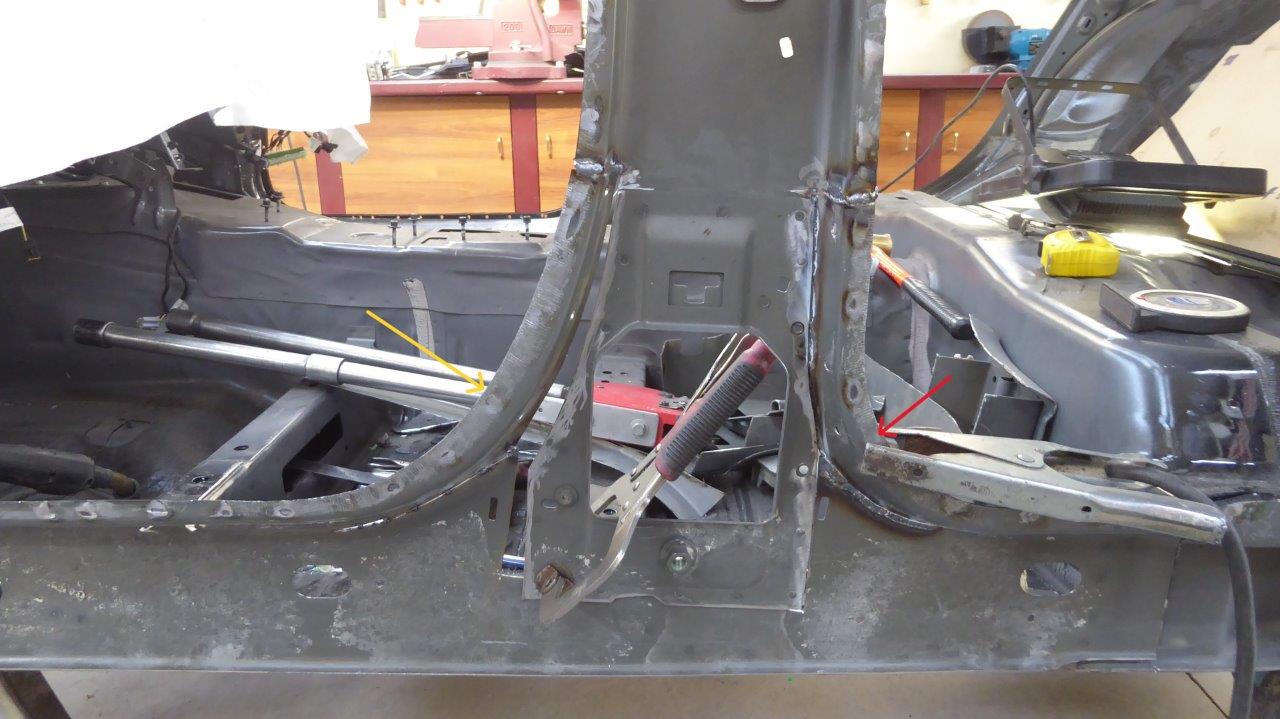
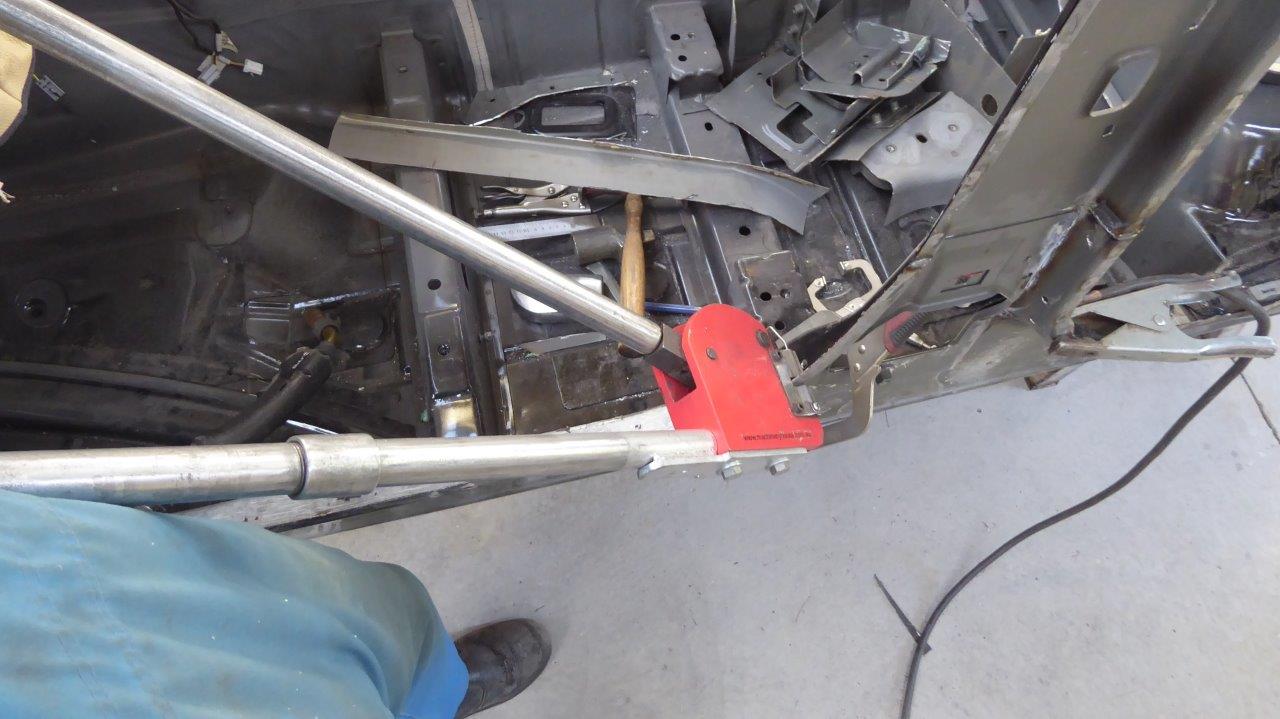
I cut straight through the pillar each side of the reel mount and down around the curved section. Then I used a potable stretcher on the back of the B pillar curved section, red arrow, and a shrinker on the forward curved section, yellow arrow, to rotate the pillar forward. You can see the gap in front of the lower reel mount of how much it had to move.

1932Willys103.jpg

The shrinker is just one that is normally used on a stand and foot operated or with the provided upper handle. I have just made my own bolt on lower handle and a longer upper one to use it in-situ.

1932Willys104.jpg

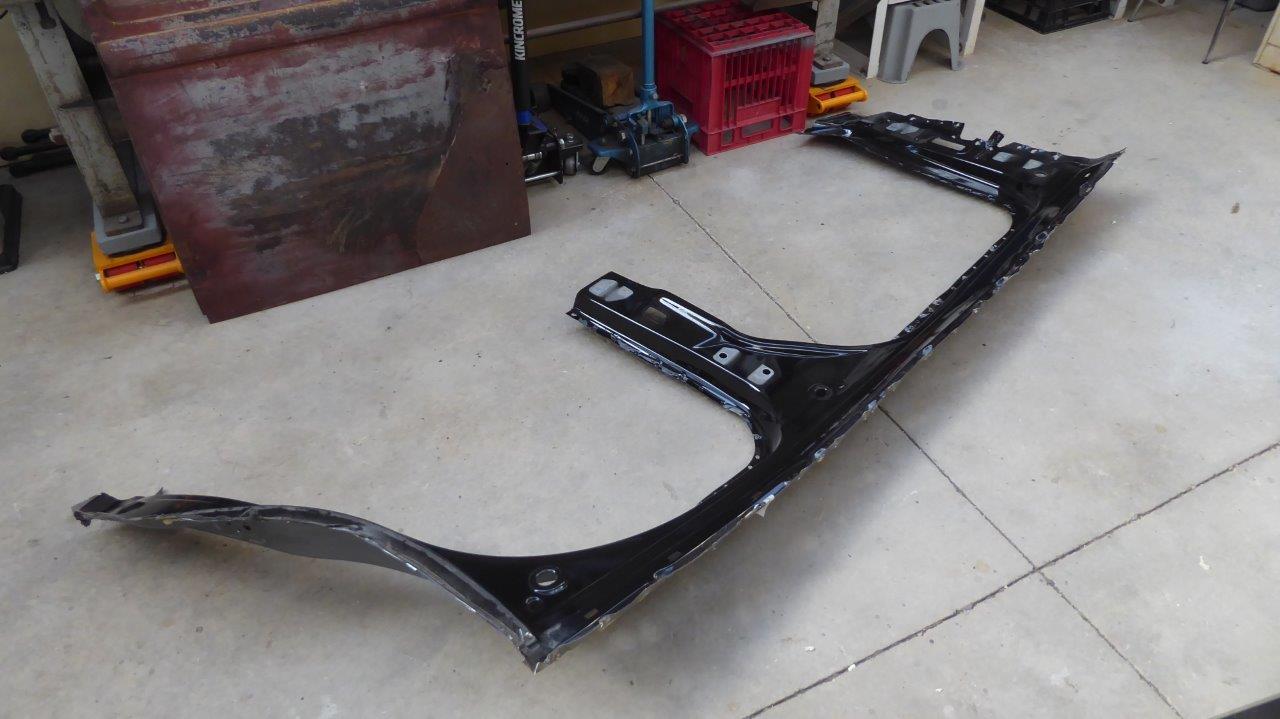
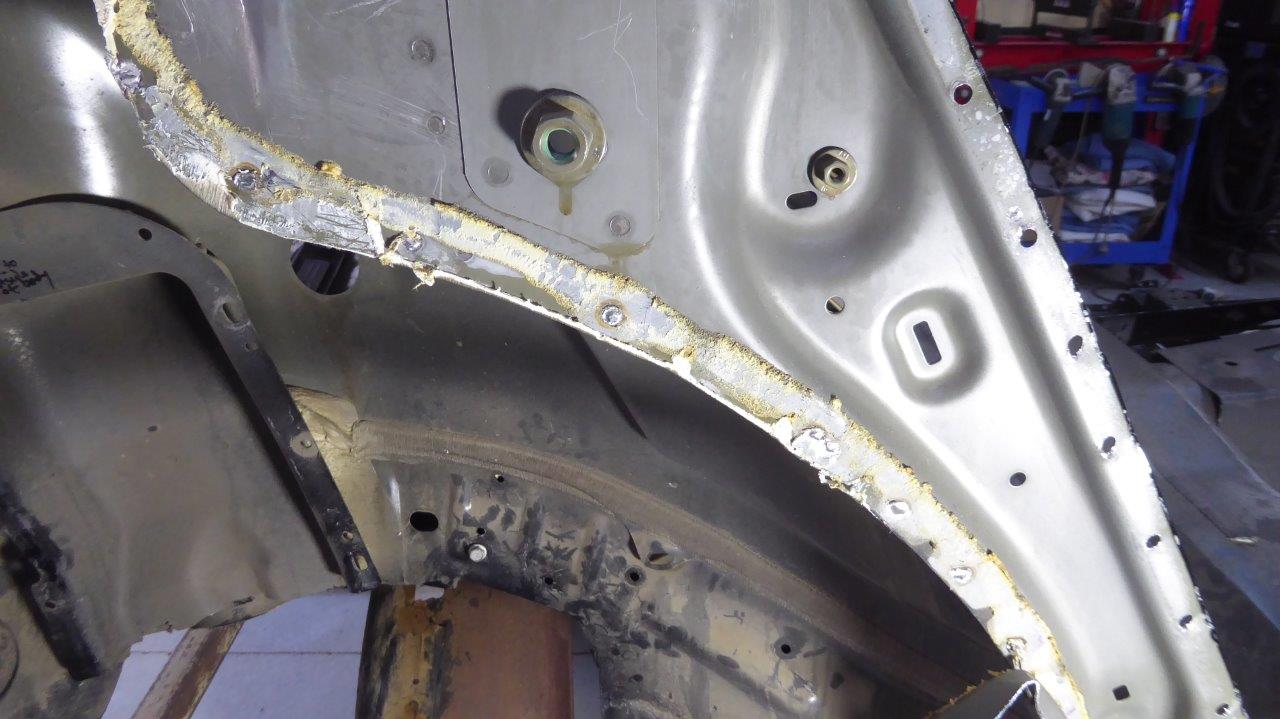
On to the other side. The part that is painted body colour actually really thin at only 0.8mm or 21 gauge and is only spot welded to the under lying piece around the perimeter and a few spots near the hinges.

1932Willys105.jpg

The structural part is still fairly thin at 1.2mm or 18 gauge. They inject a ton of foam in there to keep road noise down!

1932Willys106.jpg

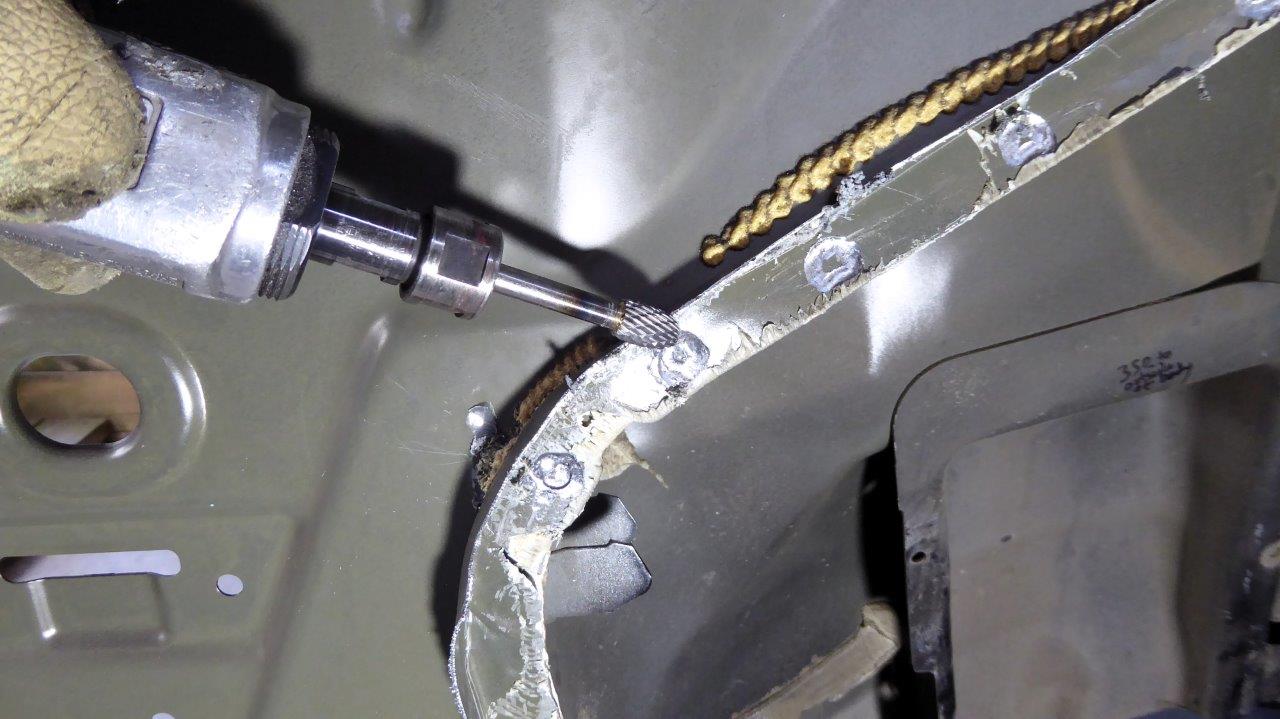
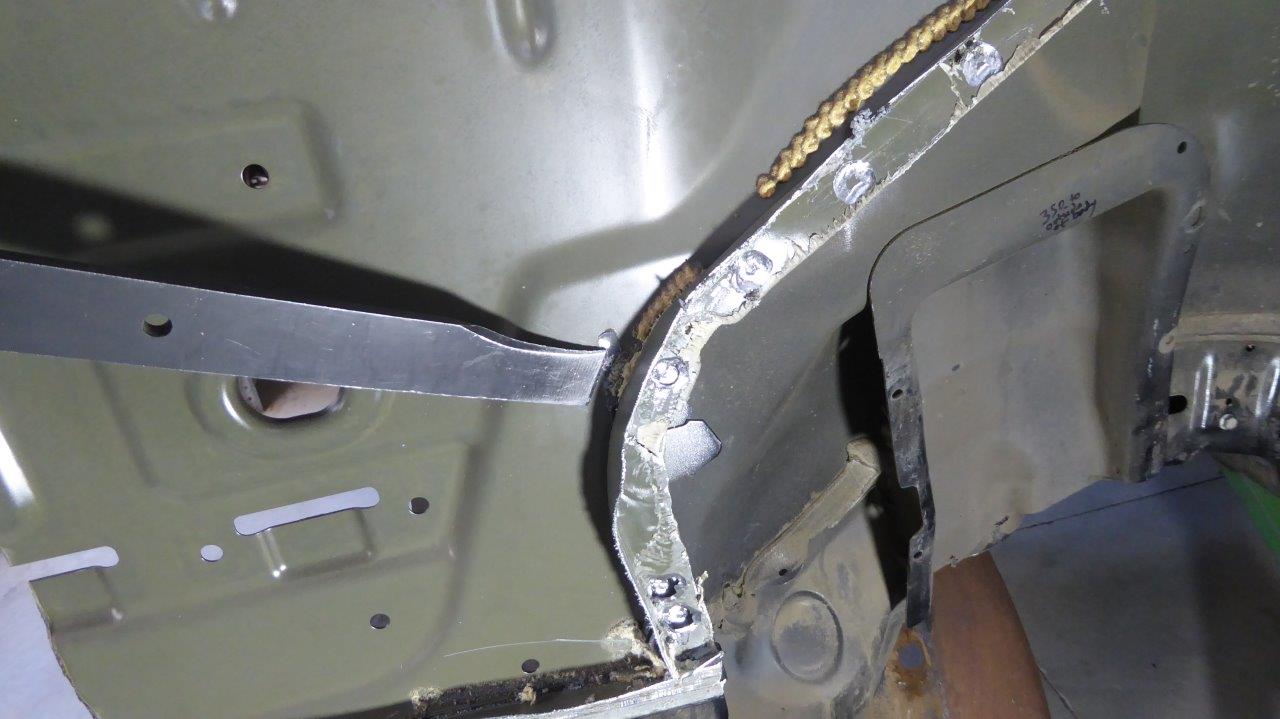
Seeing I have so many spot welds to do I have been trying different ways to remove them. I didn't want holes left after removing what is left of the inner structure flange around the rear wheel arch area, so drilling right through with a cobalt drill bit was out. I often use a centre point drill, or recently, a spot weld cutter that is like a mini hole saw when I want to preserve the metal underneath. This time I tried my die grinder with a rotary burr of the shape shown. I just ran around the edge of the spot weld to just below the thickness of the spot weld centre. Not even all the way through the thickness of the flange.

1932Willys107.jpg

Then hammered a weld splitter in between the two layers.

1932Willys108.jpg

So long as it is ground thinner than the metal underneath, it pops right off not leaving any gouges at all. Just a bit of the spot weld centre which I just remove with a flap disc during the clean up. Little effort and quick too!
 
Being a resto man, it could be said that "good" is in the eye of the beholder, and beauty is everywhere you find it, not to mention worth keeping hold of forever. Solid engineering, fine lines, and gusto when fully operational, these are marks of true beauty!
 
Being a resto man, it could be said that "good" is in the eye of the beholder, and beauty is everywhere you find it, not to mention worth keeping hold of forever. Solid engineering, fine lines, and gusto when fully operational, these are marks of true beauty!
I'm glad you can still appreciate the work being done Paul.
 
The last car we owned was a 2012 Chrysler 300. It was a very quiet unit. The 1st new car we bought was an 83 Cougar. Every car has been progressively quieter than the one before. I wasn't surprised to see foam in the side beam of the car. I wonder if it's usage is more than sound control. How about crash protection from a side hit? Metal that can't distort is stronger than the flexible portions. ???? We had a 99 Chrysler 300M. It had what looked like trash bags filled with foam in the quarter panels inside the trunk. Any car we had with the fold down rear seat had more sound deadening material somewhere. How are you going to make the Willys as quiet as the donor? :)
 
Master Marcus, in Australia when you combine two vehicles like you're doing with Elvira and you did with the truck, which vehicle is the finished product registered as? For instance, here in the land of fruits and nuts your two projects would be registered as the later model year vehicle due to extensive use of the chassis and the later model year driveline.

Can you buy Blair Rotobroach spot weld cutters in Oz? If not, I'd gladly mail you a set.

Those portable shrinker and stretcher are golden ideas. Now you need a portable spot welder.
The identify is always the chassis, regardless of body or driveline here. I only know of one build where they re-skinned a modern car with an earlier body and takes many 1000's of extra dollars to do it that way as have to pay for body torsion testing, hire a race track or airport runway to do swerve, handling and brake testing. Also have to meet all safety, pollution and relevant standards of the year of the donor car.

I found a place selling the Rotobroach cutters if these are the ones you are talking about?
https://au.jbtools.com/blair-11082-...7u42-MCg6CTM-X4QVNqSo-X--6e9SZ5jxwPWTTsYKzYqQ

Already have a portable spot welder and used it on the Truck build. ;)
1744279483371.jpeg
 
The last car we owned was a 2012 Chrysler 300. It was a very quiet unit. The 1st new car we bought was an 83 Cougar. Every car has been progressively quieter than the one before. I wasn't surprised to see foam in the side beam of the car. I wonder if it's usage is more than sound control. How about crash protection from a side hit? Metal that can't distort is stronger than the flexible portions. ???? We had a 99 Chrysler 300M. It had what looked like trash bags filled with foam in the quarter panels inside the trunk. Any car we had with the fold down rear seat had more sound deadening material somewhere. How are you going to make the Willys as quiet as the donor? :)
I know Lexus was one of the first to add foam back in the 80's or 90's for NVH reasons. Mercedes followed soon after. I have seen the bags too and would change the deformation rate for sure, so might be dual purpose now a days.
Like the Truck, there is no way to make it as quiet as the aero-dynamic differences alone would stop that. Even side mirror shape makes an audible difference!
 
The identify is always the chassis, regardless of body or driveline here. I only know of one build where they re-skinned a modern car with an earlier body and takes many 1000's of extra dollars to do it that way as have to pay for body torsion testing, hire a race track or airport runway to do swerve, handling and brake testing. Also have to meet all safety, pollution and relevant standards of the year of the donor car.
You did and are reskinning modern chassis with an old body. Seems like you would have to go thru even more scrutiny especially since you are cutting up the chassis. If the USA had the same inspections that AU does, hot rodding would never have been born here.

I found a place selling the Rotobroach cutters if these are the ones you are talking about?
https://au.jbtools.com/blair-11082-...7u42-MCg6CTM-X4QVNqSo-X--6e9SZ5jxwPWTTsYKzYqQ
Yep, that be the product. I find using lubrication wax greatly increases the sharpness durability of the cutters.

Already have a portable spot welder and used it on the Truck build. ;)
But of course you do. Silly me.
 
So this Elvira is a driver.

What, if any consideration is given to handling at this point?
Would you plan for something like defeating excessive roll due to top or side weight now, later, not at all - suspension handles that?
What about weight distribution of the new, modified parts? Would you go as far as weighing each of the matching sides before "hull" attachment?
Would you solve handling separately when you modify steering geometry?
 
The suspension will be the SRT8 using the un altered sub-frame and mounting locations in the rear. Suspension height will be at the same height etc all to factory specifications. The front will be done likewise using a unequal double wishbone setup with coil-overs set to factory specifications and geometry.
Might be best to read my truck build on how I built that to see how I go about building a vehicle this way and the results in the end.

Cheers Marcus
 
Back
Top