Oh yeah, Elvira has to have...ummmm....big headlights.Will be keeping the large 10" 'headlights' to make sure it suits the name.")

You are using an out of date browser. It may not display this or other websites correctly.
You should upgrade or use an alternative browser.
You should upgrade or use an alternative browser.
1932 Willys 6-90
- Thread starter Gojeep
- Start date
Gojeep
Well Oiled
Yep, she does.Oh yeah, Elvira has to have...ummmm....big headlights.
Gojeep
Well Oiled

We managed to get a new metal sign that has a great reproduction of an old ad of the time of the model. Thank you to my friend Ben Bower in the US for sending it out to Australia for us.

This vehicle as a donor was always the dream even when building my truck. Glad it worked out this way in the end as a sedan is a much better donor for this project than the truck. I had been keeping my eye on the wrecked vehicle auctions since getting the Silver Streak back in May. They were always selling for way beyond our budget until the last auction of the year. I placed the minimum bid on the live auction and there were no other bids! Everyone must have spent it on Christmas presents. The auctioneer said the insurance company will want a lot more than that by at least 50%, so it was passed in. Then a couple of days later my wife gets a phone call from the auction house and was told if we excepted just $250 more, it was ours.
Spooky thing is that was the exact amount we paid for the truck donor 15 years earlier. I think they just wanted to clear their books for the year and took the loss. Our gain though. 
The truck was still in pieces and getting painted at this time, so you can see parts of the bed and its tonneau in there with it. It was very hard for me not to want to work on it, but there just wasn't the room. I did however get a replacement ABS control module and fitted it, and after programming, took it for a test drive to make sure it all checked out OK. That was the reason I believe for the accident as the dealer service noted it was faulty and needed replacing, but they negated to do it.

Much prefer the SRT8 interior over the other models in the range, so that was a plus as well. Only wish we had the leather seats instead of the cloth ones of the Core model this is. The Core version of the SRT8 loses the heavy 19 speaker stereo, console cooler, as well adaptive cruise, self levelling suspension and extra driver aids etc as it is setup for better drivers and less weight overall.

In 10 years it has only done just over 50,000 km/30,000 miles which is remarkable! The 6.4 has 470 hp, so really happy about that and why I wanted the SRT8.

Fitting all the drive train and interior etc into the little Willys is going to be some task. It is 1200mm/48" shorter in length, 175mm/7" shorter in the wheelbase, and an incredibly 500mm/19.7" narrower across the firewall! The Willys wheelbase is 113", more like the 33-34 Fords which have 112", rather than the 32's which are only 106" for reference.

So the same day that the Truck came out of the workshop fully assembled after painting, the SRT8 took its place. A lot of photos, measurements and angles etc were checked. Ideas of how to exactly do things were thought through to best utilise it for the project. Confirming things I suspected like none of the front suspension can be used as the coil/shock mounts would be poking straight though the front guards!

The strip down is in full swing with all the bolt on panels removed as well as all the seats, head lining, front and rear screens etc.

Visually I did a quick check to see just how much of the dash would be seen from under the cowl of the Willys. 3/4 of the depth would be covered as the dash actually went all the way to where the glue line of the screen was as shown by the red arrow. I have already removed the demister grill that was there.

Research showed that it is better to remove the whole dash with the frame, column, ducting and wiring etc. together. The upper half of the dash can only be removed once out to get to many of the screws holding the ducting in place between the upper and lower sections.

All the wiring looms from the pillars have been unclipped and laid on the floor ready to be removed with the rest of the main harness. Most cannot be unplugged from the main harness and only small sections going to the rear ABS etc unplugs.

This is all of the main cabin harness out! I have labelled everything, even the location of some like, B pillar to rear door harness etc. There is very little that runs under the floor on this model, unlike the Grand Cherokee donor for the truck which had just as much under the floor as above it.

This floor is channelled well below the top of the door sills and has a high transmission tunnel. This gives much more head room and allows the lower stance without loosing suspension travel. I really hope I can incorporate this into the Willys.

The big step up under the rear seat is where the fuel tank sits and then it steps up again for the rear independent suspension. That sits in a cradle that bolts underneath and holds the upper and lower wishbones, lower coil and shock mounts as well as the rear diff etc. All of which I plan to keep as one piece under the Willys.
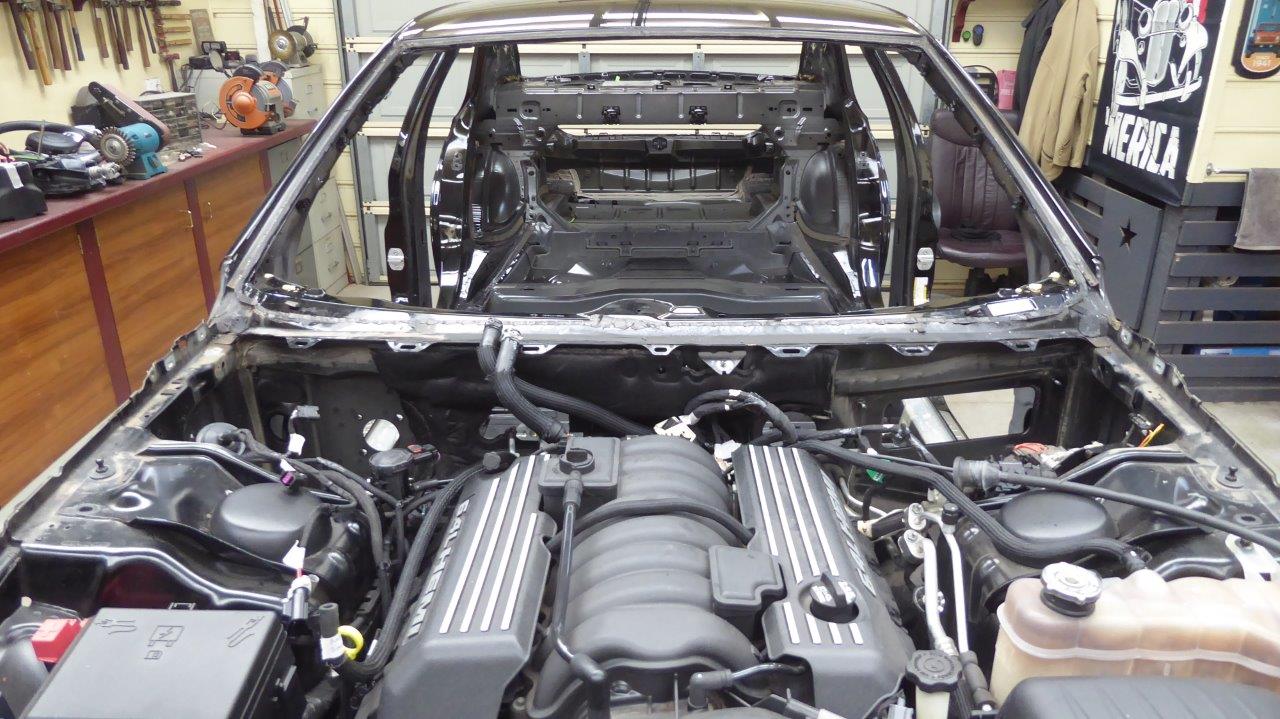
Engine bay wiring next. It is separate from the engine harness which will be left in place. Getting everything that is under here into the Willys is going to be a challenge.
Oh yeah, we gonna need LOTS more popcorn!!!
Costco sized.Oh yeah, we gonna need LOTS more popcorn!!!
- Sep 20, 2017
- 6,618
- First Name
- Jeff
- Willys Model
- Wagon
- Pickup
- CJ
- Willys Year:
- 1955
- 1958
- 1962
Marcus must be using one of those old 35mm cameras with the negative flipped. I keep seeing backwards pictures like this one in his threads.
TugboatBill
Sharpest Tool
It has to with being south of the equator. Everything is flipped from north of the equator.Marcus must be using one of those old 35mm cameras with the negative flipped. I keep seeing backwards pictures like this one in his threads.
Isdtbower
Bigger Hammer
With every picture I have seen of Elvira...Everything dress deep is compact(ed). Before it gets truly christened Elvira... "Full Squeeze" might be more appropriate.
When I got newly entertained with the truck project, it had already been sliced and diced. I missed the visioning part. There's going to be lots of Ogling, and what if's?
When I got newly entertained with the truck project, it had already been sliced and diced. I missed the visioning part. There's going to be lots of Ogling, and what if's?
commando_willys
Sharpest Tool
Well the donor sedan interior sure stripped down quickly. You have a lot of measuring and pondering to do Marcus. This will be fun.
Gojeep
Well Oiled
Manual shift patterns are the same, you just have to use your left hand instead of your right. Same box exactly, but now first is away from you and forward etc.Can anyone tell if the gear handle shift track is reversed down there? Or is it the same shift pattern? Would that confound the whole everything is reversed ancient theories?
Gojeep
Well Oiled
Been at it for a while. Think it took 3 weeks up to this point as lots of tagging and photographing everything.Well the donor sedan interior sure stripped down quickly. You have a lot of measuring and pondering to do Marcus. This will be fun.
Gojeep
Well Oiled

So here is what it looks like with just the engine bay harness removed. This is separate from the engine harness which connects to all the sensors and injectors etc on the engine itself. I have left that in place as there is no need to remove it.

So one very full 55 litre-14.5 gallon tub with the body harness on the left and half filled engine bay harness on the right. Both harnesses will be used pretty much completely!

One of the problems I have to overcome is that the engine bay is shorter on the Willys. I really don't want to move the grille forward to fit everything in. So anything I can do to prevent that will be done.

There is a good 150mm-6" between the back of the engine and the firewall though which would be prefect if I can move it that far.

I had measured a 60mm-2.3/8" difference left to right from the axle centreline back to the firewall. There was nothing obvious in the body structure to show that much difference from the accident impact. Well now that I have started pulling the front suspension out, I see a telltale sign that all is not right with the lower control arm bushing.

I had the cut the bolt head off just to get it out. Impressed that the grade 10 bolt bent so much without breaking. Cast itself is undamaged and kept the lower control arm in place. Could easily repaired by just changing the bush if needed, but not using the front suspension anyway.

With the exhaust and driveshaft out, the brake lines and ABS already disconnected, the rear suspension cradle could be dropped. Just 4 bolts holds it in place and is fully contained except for the upper coil and shock mounts.

Rolling it out on the base of an old shopping trolley. Works really well and made a few of them up for the truck build.

I did some research on how the fuel system works on the stock tank as I saw only an electrical connection on one side, but the fuel supply to the engine on the other, with no lines externally connecting the two! This is what is called a saddle tank due to the hump in the middle for the driveshaft and exhaust to run through leaving only a little space between them. This is just an example of why you have to plan ahead to use as much as possible from the late model donor if you use the electrical system. It's really is a case of use everything, or nothing at all! Below is a response from a Dodge/Chrysler engineer on Justanswer, when someone just asked what the ohms range was for the fuel level sender as was using this tank in an older vehicle and gauge cluster!
"The Fuel Level Sensor information is a bus message sent to the Powertrain Control Module (PCM) from the Body Control Module (BCM). On the primary side of the saddle tank is the Electric Fuel Pump Module that feeds the engine and the Primary Fuel Level Sensor. On the secondary side of the saddle tank is a venturi jet pump and the Secondary Fuel Level Sensor. The jet pump is connected to the Electric Fuel Pump Module on the primary side by way of a siphon tube. For each sensor, a high fuel level or volume will result in a low voltage reading and a low fuel level or volume will result in a high voltage reading (I.E. approximately 0.5 - 0.7 volts at the full position and 4.3 - 4.5 volts at the empty position) when operating properly. The PCM uses the average from both sides to determine the total fuel volume. The secondary tank Fuel Level Sensor will be at an empty position before the primary tank Fuel Level Sensor will begin to decrease due to the siphon tube flow rate always exceeding the engines fuel consumption rate. Using this assumption, the PCM performs a diagnostic to check the rationality of both Fuel Level Sensors, as well as the operation of the jet pump and siphon tube as follows; When the total fuel volume is greater than 50% the primary tank should remain at the full position. As fuel is consumed, or sloshes over to the secondary tank while driving, the jet pump and siphon tube will replenish the primary tank to the full position and the secondary fuel level should decrease. When the total fuel volume is less than 50%, the secondary tank should be at empty and the primary fuel volume should start to decrease as fuel is consumed by the engine. If either scenario fails to happen the PCM will determine that one of the Fuel Level Sensors is stuck in range, or that the jet pump or siphon tube is faulty not allowing fuel to transfer from the secondary side to the primary side of the Fuel Tank. The rationality diagnostic for the primary side of the tank will not become enabled until the secondary side level is near empty. The rationality diagnostic for the secondary side of the tank is based on the average fuel volume in the tank. It is enabled when there is enough total fuel to fill the primary tank plus enough fuel to check the rationality of the Secondary Fuel Level Sensor when a calibrated amount of fuel is consumed. Since the amount of fuel consumed from trip to trip varies based on customer drive cycles, this monitor can accumulate fuel consumption over multiple drive cycles. The monitor will run until enough fuel has been consumed to make a decision. Once a decision is made, a new test will start."

All that is left to remove is the engine and transmission. Only 4 bolts hold the engine cradle in place that also has the lower control arms and steering rack mounts etc too. Another 4 bolts retains the transmission cross member. I have the hoist crane attached to a bell housing bolt at the rear and a unused boss for the alternator at the front. There is also a trolley jack under the transmission mount to keep it level.

I just lowered the jack a bit and then the hoist, back and forth until I could easily remove the engine cradle from the engine mounts and get it out of the way.

Pressing another shopping trolley into service to hold the engine and transmission. Front of the sump is on the padded cross bar and the front of the transmission pan is on a timber support wedged in the rear of the trolley base. The jack is not supporting it anymore.

Nothing left at all bolted to the shell now. Everything now will have to be removed via cutting or drilling spot welds to get it ready for use in the Willys.

The engine and transmission wheeled out easily. They must really over engineer these shopping trolleys! Last time I had the transfer case hanging off the back as well.

Free at last. Now fingers crossed that all the time spent on planning the cutting away of everything that I can't use is right, and the project all comes together back again in the end!
Looks great.
That's an amazing level of detail they provided on Just answers. Pretty neat how they figured all that out.
It's pretty amazing modern automobiles don't cost triple or more then what they do.
That's an amazing level of detail they provided on Just answers. Pretty neat how they figured all that out.
It's pretty amazing modern automobiles don't cost triple or more then what they do.
- Sep 20, 2017
- 6,618
- First Name
- Jeff
- Willys Model
- Wagon
- Pickup
- CJ
- Willys Year:
- 1955
- 1958
- 1962
Really? That surprizes me. What are the plans then? After your comment about using all of it or using none of it I'm wondering what the plan is!but not using the front suspension anyway.
Gojeep
Well Oiled
I was referring to the electrical side of it with the all or nothing.Really? That surprizes me. What are the plans then? After your comment about using all of it or using none of it I'm wondering what the plan is!
Front suspension cannot be used at all because it would end up going straight through the fender and end up sitting next to the hood in mid air!
Will be a double wishbone setup with coilovers most likely. Wont know exactly until the engineer ok's the direction.
5JeepsAz
Well Oiled
Damn I love a good build thread. Clean! Love the all or nothing aspect. Makes perfect sense for electrics to stay whole. This is a serious dice roll considering space constraints of the engine. Heat? Also, just curious, what's the purpose of this build? Is it driver, show car, selling it? Specifically wondering what limits your design - why not extend the grille? Are you aiming at original look and modern feel?
Gojeep
Well Oiled
Limitations are the wife, as it is for her, and our very strict laws! Everything has to be approved by an appointed engineer here in Australia. It will be built like the Willys truck that had all the drivetrain, suspension and interior of a 2008 Grand Cherokee HEMI, but this one is using all the same things for the 2014 SRT8. Cabin widened/lengthened to suit the track etc, but still not losing its identity.Damn I love a good build thread. Clean! Love the all or nothing aspect. Makes perfect sense for electrics to stay whole. This is a serious dice roll considering space constraints of the engine. Heat? Also, just curious, what's the purpose of this build? Is it driver, show car, selling it? Specifically wondering what limits your design - why not extend the grille? Are you aiming at original look and modern feel?
Engine bay heat is one of the reasons I prefer to widen the engine bay rather than just the fenders. The hood sides on these are full length louvers too, so that will help.
Isdtbower
Bigger Hammer
I just returned from a week at the SEMA show. Marcus' build was well in thought. SEMA is what is new in new body designs. And SEMA is also new in older body designs. There were at least 4 Willys trucks there with different "bones." One, built over 4 years, ingesting 20,000 hours, including $230k in body mods and paint. It took 1st place in 4x4 and in the top 4 for overall...and many thought should have won. But damn. The winners car was awesome, and built by a long time winning shop and TV series. The bones of the truck are full on hot rod and trophy truck. All builds at SEMA are not hampered by "rules." Somehow they will fit into the intended use with little compromises. Marcus' truck would fit there for sure... easily. It surely accumulated those same build hours...or more and would be well appreciated. Google up SEMA 2024 trucks and photos. "red Willys Truck" Many media shoots have already been posted. Be glad there are these posts. 10 miles of carpet is not easy to walk and talk. MAny on here were following that build. (JRFab)
As Marcus has gone along, he has an intended plan and look. When doing the Trucks finishing grunt work...he was thinking of Elvira. During some private messaging, I was dispatched to look for "better ideas" than he had. He also wanted to be careful to not use a "fad" that had run the course. I didn't see all of the 1000's of wheel styles there, but I didn't see anything better than he has already proposed. Even a $1mm diamond encrusted wheel would not have looked better. LOL. You gotta know what you don't like................ What is invaluable at SEMA is that the designers and engineers are right there also. You can get their perspective on ideas. "Do you want to see the $5k ea brake package behind the wheel,. or do you want to cover it." Spokes should be a multiple of number of lug nuts. Many are not, and once you know to look, it is hard not to. Artillery wheels are 14 hole so the lug nuts should be capped. ...Now we are looking for bitchen caps for a special wheel needing correct backspacing and lug pattern. Style first. Anything can be made.... Having a great wheel already in mind, it was much easier to disregard the other 1000's. Because of the Elvira look,...I may have to go to the Grand National roadster show in LA in early Feb to see others in that vintage. I didn't see one similar at SEMA. As a Edit: Wheels look completely different when the body is lowered over them. Some work. Many don't. I was lucky to get a picture of a sudo artillery wheel with the fat boy truck body lowered to the ground. It lost it's looks....to me
ON that note: At the real high end, the Willys truck seems to be played out. Widened, Lengthened, suspended, lowered, etc, and etc. has been shown many times with great results. But maybe the Willys Truck is now the 32 year rod look, and timeless. I know, I have backed off on Willys wagon body mods to keep the vintage nod.... but does not mean we can't chop, channel, bob, lengthen, and generally mess with fenders and openings. Just not lot. I have always been a 2a type of guy, but modern wheelbase numbers just kill the 2a look. IT took a few years of watching 2a mods that a change was necessary. Going to the modified wagon or truck keeps you current with modern wheeling needs/wants.
I am fully in on Marcus' (Lica's) new choice as truly timeless with straight up stance and mods. His latest body-look picture was instantly a natural.
Again: Comments are not made to be critical...just what I see that pleases me. Gotta know what you like and don't. Walking with a friend, we both mentioned a build we didn't care for. It took us about 10 minutes to figure it out. It was not fit or finish. Just the stance. Another was a 4 door Jeep modified in Italy with huge body and interior changes. Absolutely not USA style ready, but I did have to search out the designer to congratulate going well out of the cool box. Some of the features could be toned down somewhat/or alot, to be neat in a cool, more modern build.
Feeling Marcus' stress and fun.
EDIT:
Last edited:
Gojeep
Well Oiled
Many thanks Ben for keeping an eye out for me on the wheels for Elvira.