'62 pickup front shackles

mgpar

Bigger Hammer
Aug 25, 2020
43
Virginia
First Name
mike
Willys Model
  1. Pickup
Willys Year:
  1. 1962
I’m just starting to dive into a '62 pickup.

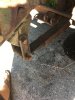
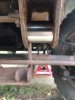
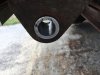
The front springs are broken and I am in the process of replacing them. Of course everything is stuck so I cut the heads off of the bolts and pressed what was left out of the brackets. After pressing out the bushing from the front driver's side shackle bracket, the remaining hole is about 1 1/4”. The bushing supplied with new shackle is about 0.87”.

Did I do something dumb? Help
 
1. What is the ID and OD of the front bushing you pressed out? ID/OD of new part.
2. Just to be sure, are you talking about the front of the front spring or the rear of the front spring? The shackles are at the front of the front spring.
3. The remaining hole in what?
4. Can you restate your problem using the words "spring eye", "Shackle plates", "frame Shackle bracket", "frame Spring bracket" when you describe holes and bushings.
5. Provide vendor and part number for any new parts involved.
 
Last edited:
Are the front shackles on a '62 the U-shaped versions or the two side plates? A picture would also help, especially if it's been modified from original.
 
1. What is the ID and OD of the front bushing you pressed out? ID/OD of new part.
2. Just to be sure, are you talking about the front of the front spring or the rear of the front spring? The shackles are at the front of the front spring.
3. The remaining hole in what?
4. Can you restate your problem using the words "spring eye", "Shackle plates", "frame Shackle bracket", "frame Spring bracket" when you describe holes and bushings.
5. Provide vendor and part number for any new parts involved.
FC8FBE03-F5EF-4F33-8FF1-4A531BE18D90.jpeg. Hi Seejay thanks for the response. It is the front of the front spring and the newer style shackles . The hole I am talking about is in the bracket that is welded to the frame, there is one hole on each side of the bracket. It will be this afternoon before I can get measurements. The old stuff from the drivers side has already been thrown away but I can get some measurements off of the passenger side because it looks the same. I’ll take pictures this afternoon also
 
Are the front shackles on a '62 the U-shaped versions or the two side plates? A picture would also help, especially if it's been modified from original.
I’ll get pictures of it with the shackle and bushing removed this afternoon
 

Attachments

  • CCD5D6CA-3F24-4DDB-A5EE-F672A8C65EB1.jpeg
    CCD5D6CA-3F24-4DDB-A5EE-F672A8C65EB1.jpeg
    315.6 KB · Views: 25
My '55 has the u-shaped shackles so unless a PO "upgraded" I can't help much by comparing. I wonder of the tube that's welded in the frame bracket has a different ID for the two styles. In the U-style the "nut" screws itself in (onto the U-shackle actually), with the plate style, the bushing is pressed in and the 7/16" diameter bolt inserted. The bushing consists of two metal sleeves separated by a layer of some type of rubber. I haven't looked it up, but I assume the later CJ's use the same size bushings as the trucks and wagons, and the U-shackles are the same as well. If this is true, I think I have some loose CJ parts I can measure to compare with what you have.
 
I re-read your first post. Could you post a picture of the bracket that you pressed the bushing out of? It sounds like you pressed out the welded tube rather than just the bushing.
I also re-read your other comment where you stated that you threw away the old parts. You broke a cardinal rule of working on old stuff. Nothing ever gets thrown out until the restoration is completed, and even then you question whether that stuff should be saved a little while longer. We all learn that one the hard way.
 
Last edited:
I re-read your first post. Could you post a picture of the bracket that you pressed the bushing out of? It sounds like you pressed out the welded tube rather than just the bushing.
I think you hit the nail on the head. I thought the only thing there was the bushing so I cut it out not realizing there was a welded tube there. The front part of the spring was still attached when I cut it because everything was frozen and I couldn't really see what I was cutting. I guess my choices now are to weld a new tube in or replace the bracket. I have located tubing that is the right size and we have a machine shop if I need to make any adjustments to the tube. I don't want to replace the bracket unless that is the only way to fix it because it is riveted and welded to the frame. Glad I decided to just do one side at a time. I will do the passengers side a different way without cutting. I'll take some pictures after I get home this evening.
 
Yes, make the necessary bushing. Don't remove bracket. Good recovery!!! No sweat.
 
I re-read your first post. Could you post a picture of the bracket that you pressed the bushing out of? It sounds like you pressed out the welded tube rather than just the bushing.
I also re-read your other comment where you stated that you threw away the old parts. You broke a cardinal rule of working on old stuff. Nothing ever gets thrown out until the restoration is completed, and even then you question whether that stuff should be saved a little while longer. We all learn that one the hard way.
Thanks for the help. Lesson learned 1 make sure you know what you’re cutting 2 don’t throw anything away. Glad I just did the drivers side so far I won’t make the same mistake on the passengers side.
61E392CB-B628-4539-9DE7-F3480C46BB6D.jpeg757D9845-090A-4790-83CF-8C58412D8939.jpeg0E51EA08-3362-4D7D-A56E-B80828875070.jpeg1E0A25FD-D094-4901-86E5-9B6DDA6AF483.jpeg
 
one 1.25 +/- OD Bushing with a .880 +/- ID comin right up sir.
 
one 1.25 +/- OD Bushing with a .880 +/- ID comin right up sir.
Yep that’s what I need to do now. Thanks for the help SeeJay. Lesson learned make sure I know what I’m cutting if I need to cut something.
 
Update to the shackle bracket mistake. I found a 1 foot piece of low carbon steel tube at McMaster Carr that was almost the exact OD and ID I needed. It was 1.25 OD and .87 ID I just needed to take a couple of thousands off of the OD and run a 7/8ths reamer through the ID. Turned out just right. Just need to weld it in place now. Lesson learned make sure you know what you’re cutting.
 

Attachments

  • 07E16872-3451-4538-9D2C-F5523D9C92DC.jpeg
    07E16872-3451-4538-9D2C-F5523D9C92DC.jpeg
    116.3 KB · Views: 29
  • 34444729-8689-4CFA-AA84-CE5AED47F380.jpeg
    34444729-8689-4CFA-AA84-CE5AED47F380.jpeg
    111.2 KB · Views: 29
I don’t get a lot of time to work on the Willys but I have completed replacing the drivers side front spring. Lessons learned from that side is making the passenger side easy. Almost done with passenger side in just a couple of hours.
 
Looks like You have the same plow brackets that I have on my truck, is yours also welded to the frame on the drivers side? Mine is broken at the angle iron braces that connect to the spring pivot bolts. I was going to weld it off the truck and discovered its welded to my frame
 
Looks like You have the same plow brackets that I have on my truck, is yours also welded to the frame on the drivers side? Mine is broken at the angle iron braces that connect to the spring pivot bolts. I was going to weld it off the truck and discovered its welded to my frame

The one’s on my truck are bolted. It made changing the pivot bolts for the front springs a little challenging because there is a hole in the plow bracket for them but they are not really big enough to allow you too get a socket on the bolt. I didn’t want to unbolt the bracket so cut the head off of the bolt and pushed it out.
 
Last edited:
Back
Top