My ‘49 Jeepster build

Colors
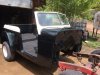
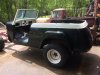
I'd been beating on this for a couple years now. With the evolution of the internet, I have close to 1000 pix of different Jeepsters and color schemes. The color I had it painted years ago was supposed to be a burnt orange like the 71 Chevelle I had. I never was real satisfied with the results. I always liked blue but not for the Jeepster. So after looking at all I had to look at, I narrowed it down to three schemes.
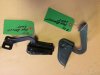
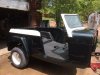
I went back and forth to these vehicles but was unsure of the body lines of the Jeepster would support the colors of the orange or unsure I could get the orange I wanted. I played around with some mockups as well. The jeepster that I interpreted as green and cream got a lot of attention. I never was a green fan but I loved this jeepster. The new body was almost the same color as the one I liked in the picture. The cream was along the lines the wagon was painted as so I decided to go the the center scheme and went shopping for a paint and body shop.
Style.jpg
I drove to Cheyenne, Greeley, and Longmont checking out places I found through the internet or here on the forum. The rocky mountain region has been blessed with a lot of hail the past years and most the timeframes at the shops were 6 months to a year out. I was really ready to release the project to someone else immediately. The last stop was Ozzies body shop in Longmont recommended here as a possible shop. I called prior to getting there and they told me to come in and talk with them I talked to Dennis who was the owner of the shop and he personally ran a "vintage" shop to do stuff like that. I told him about the great body and he told me he sees a lot of bodies described as rust free and straight and he would have to decide on inspection whether to take on the job or turn it away. I told him I should have enough pix to convince him of the condition and we looked at them from the usb drive I brought. He was satisfied and gave me a quote and told me that he usually has a month between the major jobs and he was completing a major in about 6 weeks and to give him a call. He also told me that his daughter was taking over and he was cutting down on his time. He had some experienced guys in the vintage shop. I was excited and started cataloging all the parts for them as I would deliver a tub on wheels with the doors in place. PARTS.jpg
 
I started working on the power steering as the thread https://www.oldwillysforum.com/forum/index.php?threads/power-steering-in-a-stock-60-wagon.14840/ pointed out some options. The main option was the Classic Performance Products CP50006C Power steering box in this thread. It was practically a bolt on replacement. Putting on the power steering pump took 5 times as long. All of the details are found in this previous discussion so look at it for most the pix. Here areIMG_5636.JPGIMG_5632.JPGIMG_5643.JPG a couple here.
 
As time started closing in on getting the paint job going, I started emailing and calling Ozzies. In the email, I explained the visit with her Dad and it was time to get my jeep in. she told me to call back in 6 months and it would be probably a year before I could get it in. I was devastated. I tried calling and left messages on voice mail couldn't get a return call. I finally drove the 120 miles down there to get an answer. I ran into her Dad right off the bat and explained to him why he was there. He told me it was a misunderstanding and this wasn't a 6 month window but maybe a 45 day window and they could do it. The daughter was brought up to speed. So I went home and started getting ready. She called me two days later to return my call and treated me like a new customer with a new project and really didn't associate me with the visit two days before. At this time I wrote her off as a basketcase and in the months to follow, she worked on good reasons to convince me I was right.

I finally got to moving day, loaded up the trailer with the body and chassis and the rest of the parts in my Expedition. I left it at their shop and returned home to detail the chassis.IMG_5859.JPGIMG_5858.JPGIMG_5857.JPGIMG_5856.JPG
 
Chassis time! I installed the CPP power steering kit shown in post #42 when the new body was in the paint shop. I cleaned out all the wiring and devices and then I pulled the old body off of the frame using my hoist.IMG_6147.JPGIMG_6148.JPGIMG_6149.JPG
I borrowed a small snowmobile trailer and dropped the body on it temporarily as the new body was on the rolling chassis. I'll put the old body on the rolling chassis when I put the new body on the chassis that will stay. I certainly made the right decision on the bodies but I know a few tears hit the floor after spending so many adventures in this body with dad and family and friends. I hope I can find a good home for it.IMG_6640.JPGIMG_6639.JPGIMG_6638.JPGIMG_6636.JPGIMG_6634.JPGIMG_6631.JPGIMG_6630.JPGIMG_6629.JPG
 
Prior to buying the other body, I had hooked up the tow bar and towed the unit to town. My vain attempts at an exhaust system 30 years prior, was going to be replaced with all new. I dropped the unit off and picked it up a couple days later, short some cash but had new pipes and mufflers and they did a super job. So now with the body off, I then wire brushed the entire frame, then pressure washed. I cleaned up all the areas with a grinder, went after the rear of the frame rebuilding the end of it and reinforcing with new steel. I also rewelded and reinforced the central part of the frame that was flexing throughout the years. I gave the entire frame a POR treatment and two coats of paint. The gas tank and electric fuel pump had replaced a couple years ago with a poly unit when the old body was on it.
IMG_6222.JPGIMG_6223.JPGIMG_6224.JPGIMG_6225.JPGIMG_6230.JPGIMG_6229.JPGIMG_6228.JPGIMG_6227.JPGIMG_6226.JPG
20190303_142921.jpg
IMG_6221.JPG
 

Attachments

  • IMG_6223.JPG
    IMG_6223.JPG
    204.5 KB · Views: 0
Last edited:
It was about this time when the 2019 Moab Willys Rally went on. The wife and I went on another adventure with the wagon. Had a great time other than a front tire blow out at 70 mph after driving on the potholed I-70 down from Silverthrorn to Rifle Colorado.
IMG_6450.JPG
I changed the tire and wheel and drove to Grand Junction and found a Tire place that replace both fronts in about two hours (as it was Memorial Day Friday). We went to Walmar while I waited and bought some electromotive as it had acted like the engine was missing since the blowout and a little earlier after I washed the wagon at a car wash. I cleaned out the distributor and put back together. Wen we pulled on the entry ramp back onto I-70 it just flat out died. I pulled over on the ramp (thankful I didn't make it on the interstate). Opened the hood and started thinking, fuel/spark, fuel/spark. I went right back to the distributor and seen the coil wire had worked off of the coil. I plugged it back it and away we went to finish the trip. I had replaced the thermostat gasket prior to leaving and must not have plugged the coil wire in very securely. The new overdrive tranny worked well on the road as well as the 4 row radiator I put in after last years adventure to Moab. It was a super day for driving.
The rally was great and we stayed right at the Red Mountain Inn with second to none views. While I was there, I won a $150 Gift certificate for Kaiser Willys. This would go towards rebuilding the T90 transmission in the Jeepster.
DSCN5420 (2019_08_17 22_59_30 UTC).JPG
 
As the chassis is sitting bare, pulling the tranny and transfer case was a 10 minute job. The complete overhaul parts kit from Kaisers had a tight fitting low and reverse gear in the slot that the shifter fork fit into and when I checked what I had, the old gear was in great shape and didn't have the tight fit. I also had another transmission rebuild and left over parts to chose from.

The T90 previously had some issues with slipping out of 2nd gear and Willy001 told me about shimming the output shaft to remedy. I had about .060-.065 slop from what I remember and was able to get it down to the book which I think was .010 to .015 with mcmaster carr shims. All the cases were cleaned and painted. The bench test was alright and I wired the Low/Reverse gear into position as I would left the shifter off until the body was put on and I didn't want to have the gear slide in an off position should I start the engine later on.

I had been driving the chassis back and forth by starting the engine with a remote starter with a kill switch wired in that I would have to hold in my other hand. I did this in case I was manouvering/moving/driving the chassis out of the bay to the driveway and back into the opposite bay with no steering wheel. In case I fell doing this precise movement, the chassis wouldn't drive over me or through the wall as the kill switch had to be held shut and dropping it would kill the engine. I remember my wife walking by when I was moving the chassis one day. She just shook her head and walked off.

I also bought a brand new shifter assembly 946111 to help solve the slipping out of 2nd. It came with a port for a reverse switch. The switch I bought had a 9/16 thread on it but the threads in the shifter were about 11/16. This is another time I asked our vendors for a technical question and got a unsatisfactory reply like "I don't have a good listing for that item", the last China repair part I got advertised with instructions and template, it came with neither and I have not gotten an answer back from the Vendor on how the mirror is installed. Seems like they don't really care. So I found a straight threaded adapter that fit and had to shorten the threads due to the thin wall and was able to get the reverse switch to function. I JB welded the assembly with adapter into the threaded port.

This shifter had the rear shift rods completely enclosed with the casting so hopefully the leaks will be gone from this area. They require no seals. I filled from the top and made a temporary cover until I permanently mounted the shifter assembly. This would help because I have the awesome ability to drop things into infinite dark inaccessible cavities.
 

Attachments

  • IMG_6575.JPG
    IMG_6575.JPG
    254.2 KB · Views: 4
  • IMG_6576.JPG
    IMG_6576.JPG
    181.1 KB · Views: 4
  • IMG_7153.JPG
    IMG_7153.JPG
    173.2 KB · Views: 4
  • IMG_7154.JPG
    IMG_7154.JPG
    160 KB · Views: 4
  • IMG_7155.JPG
    IMG_7155.JPG
    152.1 KB · Views: 4
  • IMG_7156.JPG
    IMG_7156.JPG
    199.1 KB · Views: 4
  • IMG_7157.JPG
    IMG_7157.JPG
    157.1 KB · Views: 5
  • IMG_7197.JPG
    IMG_7197.JPG
    156.5 KB · Views: 5
  • IMG_7198.JPG
    IMG_7198.JPG
    184.3 KB · Views: 5
  • IMG_7199.JPG
    IMG_7199.JPG
    220.3 KB · Views: 5
  • IMG_7200.JPG
    IMG_7200.JPG
    179.6 KB · Views: 5
  • IMG_7201.JPG
    IMG_7201.JPG
    198.6 KB · Views: 5
  • IMG_7202.JPG
    IMG_7202.JPG
    283.5 KB · Views: 4
  • IMG_7237.JPG
    IMG_7237.JPG
    189.1 KB · Views: 4
  • IMG_7340.JPG
    IMG_7340.JPG
    212.4 KB · Views: 4
Last edited:
After rebuilding the tranny, I decided that it is just too easy to do a clutch job since everything is sitting in front of me and easy access. I researched and bought a diaphram style clutch, new fork, new push rod for the slave cylinder. I had to make a new bracket for the clutch slave cylinder (which was probably put in after robbing a 50's mercury of it's pedals, master cylinder and slave that I had replaced years ago). That's the nice thing about winning gift certificates. This $150 free certificate cost me $550 additional to use it for the transmission rebuild. The D18 transfer case had new gaskets installed on the access pan and I'll dive back into that some later time in the future as I have bought double lipped yoke seals to put in and I am still toying with the overdrive option if I want more from the 3.53 gearing from the scout axles. I wasn't sure about the clearance for the overdrive to the crossmember so I asked on this forum for dimensions and a generous member sent me the pix. I'll have no problem installing a overdrive unit in the future. The top will be left open and sealed with plastic/cardboard until I decide on the interior scheme and how I will complete the unit.
1608118906132.png1608118990579.jpeg
1608118959658.jpeg
1608119000796.jpeg
 
Meanwhile back at the paint shop, they found a few things that I didn't see and I gave them the go ahead to fix them. The main problem I had with the body shop was communications. The actual guy doing the work didn't have an email setup so I had to send pictures either by phone (which is tough as my cellular signal isn't that great on the mountain. I could send emails to the owners daughter but unsure whether she would look at them or not or forward to the detail guy. Anyway the interior wasn't done quite the way I wanted as an end result. Probably a result of the airhead I had to communicate with. So here's a few pix of the work in process. Really the most damage to this body seemed to be the attachment areas where the convertible frame was mounted. It almost looked like a single person tried to remove the frame and it got away from him, damaging the mounting areas.
 

Attachments

  • IMG_5828.JPG
    IMG_5828.JPG
    136.1 KB · Views: 4
  • IMG_6165.JPG
    IMG_6165.JPG
    107.8 KB · Views: 4
  • IMG_6166.JPG
    IMG_6166.JPG
    139.4 KB · Views: 5
  • IMG_6167.JPG
    IMG_6167.JPG
    158.3 KB · Views: 4
  • IMG_6168.JPG
    IMG_6168.JPG
    127.8 KB · Views: 4
  • IMG_6169.JPG
    IMG_6169.JPG
    141.4 KB · Views: 4
  • IMG_6170.JPG
    IMG_6170.JPG
    153.2 KB · Views: 4
  • IMG_6201.JPG
    IMG_6201.JPG
    149.1 KB · Views: 4
  • IMG_6202.JPG
    IMG_6202.JPG
    168.5 KB · Views: 4
  • IMG_6203.JPG
    IMG_6203.JPG
    141.5 KB · Views: 4
  • IMG_6204.JPG
    IMG_6204.JPG
    126 KB · Views: 4
  • IMG_6206.JPG
    IMG_6206.JPG
    144.6 KB · Views: 4
  • IMG_6207.JPG
    IMG_6207.JPG
    209.7 KB · Views: 4
  • IMG_6208.JPG
    IMG_6208.JPG
    129.3 KB · Views: 4
  • IMG_6209.JPG
    IMG_6209.JPG
    117.7 KB · Views: 4
  • IMG_6537.JPG
    IMG_6537.JPG
    126.7 KB · Views: 4
As you may guess, about the time I was getting caught up with everything, the phone call came and I would go back down to the Body Shop to pick up the Jeepster body. I ran over to my cousins to borrow his trailer and in doing so, found out that the previous person that "borrowed" it had damaged the ramps and ramp mounting on the trailer. After getting the body to this point, I figured that it would not be a good idea to have it fall off the damaged ramps so I had to spend an afternoon working on the trailer. The trip 250 mile round trip went well and I brought it home. I had the entire interior linex'd and the lower exterior undercoated as well. The new glass and gaskets were installed by them. They did a great job but lost the convertible frame handle and painted the spare tire cover the wrong color, which they corrected later when I dropped off these parts on an airport run.

I know I am going to get beat up someday by you guys about the yellow hood (installed after the tree incident) on the pickup. I actually have primer to paint it with.
IMG_6663.JPG
 

Attachments

  • IMG_6668.JPG
    IMG_6668.JPG
    196.1 KB · Views: 4
  • IMG_6671.JPG
    IMG_6671.JPG
    165 KB · Views: 4
  • IMG_6672.JPG
    IMG_6672.JPG
    183.6 KB · Views: 4
  • IMG_6675.JPG
    IMG_6675.JPG
    325.2 KB · Views: 4
  • IMG_6679.JPG
    IMG_6679.JPG
    153 KB · Views: 4
  • IMG_6678.JPG
    IMG_6678.JPG
    218 KB · Views: 4
  • IMG_6677.JPG
    IMG_6677.JPG
    253.2 KB · Views: 4
  • IMG_6676.JPG
    IMG_6676.JPG
    280.8 KB · Views: 4
  • IMG_6674.JPG
    IMG_6674.JPG
    214.4 KB · Views: 4
  • IMG_6673.JPG
    IMG_6673.JPG
    232.1 KB · Views: 4
  • IMG_6670.JPG
    IMG_6670.JPG
    243.2 KB · Views: 4
  • IMG_6669.JPG
    IMG_6669.JPG
    173.7 KB · Views: 4
  • IMG_6667.JPG
    IMG_6667.JPG
    252.5 KB · Views: 4
:cool:
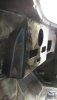
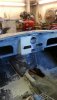
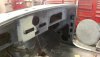
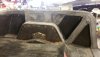
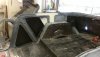
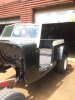
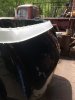
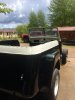
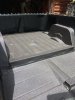
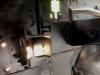
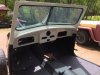
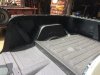
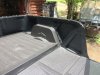
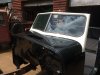
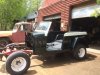
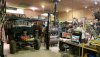
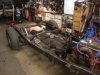
After giving all the thought to it I could, it is now the day to pull the body from the sacrificial rolling frame. My son in law was visiting at this time so I had some assistance in this. Everything went well and the body would find a home for a while under the lift while the chassis will be moved in and out during the fitting and mounting process for a while. The frame would be moved outside by the Pickup. We staged the chassis under the unit and I got my first real look at where I was headed with this project. IMG_7122.JPGIMG_7114.JPGIMG_7111.JPGIMG_7116.JPGIMG_7117.JPG
1608134663567.png
 

Attachments

  • 20190717_174411.jpg
    20190717_174411.jpg
    227.7 KB · Views: 11
Last edited:
Mounting the body. We were able to drop the body down without too much hardship and my concerns of duplicating all the time I spent remounting the other body to the chassis. The efforts the last time paid off as most of the mounting pads were close and required not too much tweaking. The rear end of the chassis fit pretty well.
1608137498818.png
The rear fenders had to be cut where they extended underneath to the frame. This was done easily and did not effect anything else. The side to side alignment required a little tweaking of the mounting holes and resulted in being spot on. The linear alignment was adjusted slightly to accommodate the valve cover of the small block engine.IMG_7244.JPG
The tranny cover and the cutout for the shifter had to be enlarged about 1/4-1/2 inch. This wasn't too bad in that I fabricated all of that from measurements and not actual fitting during the firewall modification 6 months earlier. The tranny/transfer case cover I made would be redone further down the road as it was the thing to do. There was no major disasters resulting from my layouts and fabrications.
IMG_7334.JPG
IMG_7343.JPGIMG_7342.JPG
 
Last edited:
The next obvious step was to finish off the firewall which would include the insulation, mounting of the wiper mechanism, the master brake and clutch cylinders, the firewall insulator I had bought new and installed on the other body.
IMG_7428.JPG
IMG_7440.JPGIMG_7439.JPG
 
The stay at the hoist is over. I am able to fire up the engine, make sure the road is clear, and move the Jeepster out of the hoist bay to the bay next door. A couple of photos to admire the combination of body and chassis. Next is to start planning to start the electrical as I have the best access right now without fenders, pedals, steering wheel, and interiorIMG_7468.JPGIMG_7470.JPGIMG_7471.JPGIMG_7472.JPG
 
While planning the electrical, I decided to mount the spare tire carrier to get an idea of how the beaded fender welding will go. Then I will mount the rear taillights as I do this as a matter of procedure in the electrical. I bought LED tailight builb and plan on utilizing LED lights for everything. IMG_7543.JPGIMG_7546.JPGIMG_7547.JPGIMG_7550.JPG
 
I decided after all the experience I built up over the last 45 years to buy and install a Speedway 22 circuit wiring harness. That turned out to be a great decision.

I mounted the fusebox on the inner firewall and between the future hanging pedals. I will then lay out the wiring loom to each zone or device that I will need to wire to. For that reason, I had to pull out my Pirate Steering Column that I bought new and had painted with the parts. If I had it all to do over again, I would buy a different column due to quality reasons. I modernized the steering column to eliminate the turn signal switch and the ignition switch which should keep the dash cleaner and hopefully more modern parts.

This is the last thing I will do this year as I bought a home in Florida to winter in and regrettably, I will walk away from the body/chassis for 6 months. I will be taking small parts with me and will continue with them for the wintertime. I wanted to drive this to the 2020 Moab rally but that looks entirely unrealistic for now.IMG_7561.JPGIMG_7558.JPGIMG_7613.JPGIMG_7606.JPG
 
Last edited:
On this 6 month sabbatical, I took along two sets of the Jeepster door latch mechanisms and windshield visor parts for my Willys Wagon. When I got around to it, I inspected the two sets of the door latching mechanisms and delegated one left and one right to be put into the doors when I get back. Basically bathed it in WD40 rust dissolver overnight, cleaned, put complete springs in each and reassembled. I sprayed them down with lithium spray whereas they would be stored until I needed them. Jeepster Jim has a decent video on these latches and I believe Jeepsterman has new springs for them as well.


Another thing I accomplished with the easy button was to square away the front bumper situation. A few years prior, I mocked up the front with a late model CJ rear bumper to see if I would be happy using it.bumper.jpgI had already made the decision that the PTO winch that saved so many souls through the decades was going to be retired. Although this would remain a four wheel drive, the days of pulling out of situations and pulling others out as well, was over.
While displaced from the project, a complete Willys front bumper and guards came up on Ebay. Rechromed and looked like a million dollars. I watched it for a few weeks and made an offer on it and it was accepted. I received it a week later and unpacked it. A happy camper I was as the front bumper situation was completed. I packed it back up for the trip home.
IMG_8078.JPGIMG_8079.JPGIMG_8081.JPGIMG_8084.JPGIMG_8086.JPGIMG_8087.JPGIMG_8088.JPG
 

Attachments

  • IMG_8076.JPG
    IMG_8076.JPG
    160.2 KB · Views: 1
  • IMG_8077.JPG
    IMG_8077.JPG
    136.4 KB · Views: 1
  • IMG_8080.JPG
    IMG_8080.JPG
    216.3 KB · Views: 1
  • IMG_8082.JPG
    IMG_8082.JPG
    215.9 KB · Views: 1
  • IMG_8083.JPG
    IMG_8083.JPG
    114.6 KB · Views: 1
  • IMG_8085.JPG
    IMG_8085.JPG
    121.4 KB · Views: 1
  • IMG_8089.JPG
    IMG_8089.JPG
    219.6 KB · Views: 2
  • IMG_8263.JPG
    IMG_8263.JPG
    162.6 KB · Views: 2
Last edited:
And while I was MIA, I had been keeping my eye on some body trim from JeepsterJim in Florida. I was able to purchase it and drove to his facility in Florida to pickup. Steve Vacarro has always given me some much needed advice whenever I asked and I was elated to go there pick up the trim while given a tour of his facility.
IMG_8264.JPG
It was definitely worth the trip to see his operation and so many jeepsters in various stages of build including this beauty that was only a couple weeks from completion.IMG_8215.JPGIMG_8216.JPGIMG_8217.JPGIMG_8219.JPGIMG_8218.JPG
 
Last edited:
I'd forgotten to mention that I brought all my gauges and can, with me. I pretty well memorized Scramobleer's thread on gauge rebuilding.

I bought the decals off of this forum. I then found some paint to match up fairly well. I had one face that was rusted more than I cared for and Scramboleer took care of that for me. I then left the faces in a plastic tray with brake fluid and the old paint floated off after leaving overnight. Then I sanded with 600/800 grit wet sandpaper. I did this again after painting with the dark color. The decals lined up nice and I topped off the P's and the A's with a paint dot.

I took a Tupperware lid and made new insulated backs for the gauges. I polished up the bezel which was pretty nice to begin with. I then bought some model paint and reading about the trails and tribulations of painting the Willys insignia. I found that using a hypodermic needle and paint that I was able to fill the circular trough evenly and easily. I made all new gaskets from 1/16" neoprene stock. I found coupling nuts to replace the special nuts for the mounting of the cans and they worked great (if not better than original).

I had already tested these for function with the sending units prior to this. The temp gauge did not work in the long haul even with the new sending unit. It was the sending unit and I replaced it. I also installed a 2nd voltage regulator troubleshooting the gauge. I may install a 3rd which would allow me to fine tune each of the gauges.

1610483596332.png
 

Attachments

  • IMG_8260.JPG
    IMG_8260.JPG
    147.5 KB · Views: 6
  • IMG_8259.JPG
    IMG_8259.JPG
    137.8 KB · Views: 5
  • IMG_8261.JPG
    IMG_8261.JPG
    135.4 KB · Views: 5
  • IMG_8265.JPG
    IMG_8265.JPG
    233.6 KB · Views: 5
  • IMG_9249.JPG
    IMG_9249.JPG
    168.5 KB · Views: 5
  • IMG_8399.JPG
    IMG_8399.JPG
    121.1 KB · Views: 5
  • IMG_8378.JPG
    IMG_8378.JPG
    228.9 KB · Views: 5
  • IMG_8388.JPG
    IMG_8388.JPG
    149.1 KB · Views: 6
  • IMG_8418.JPG
    IMG_8418.JPG
    108.1 KB · Views: 7
  • IMG_8419.JPG
    IMG_8419.JPG
    96.4 KB · Views: 8
  • IMG_8372.JPG
    IMG_8372.JPG
    135.5 KB · Views: 7
Back
Top