Fino's ‘58 Wagon

I have something similar which may help. On mine it looks like the plate that the 226 motor mount is bolted to is removed, possibly by drilling out the plug weld. Then the saddle mount is bolted on to the frame mounts through that hole. From the looks of it I don't see why they bothered to remove the palte. This is (apparently) a '57 Chevy 283 in my '61 parts wagon.
IMG_5530.JPG
IMG_5529.JPG
IMG_5531.JPG
 
Last edited:
Then, the T90 was adapted with a simple adapter plate. I don't know what the stick-out length is on the T90 but IIRC the 226 version had a very long input shaft. My bellhousing is obviously different than yours.
IMG_5542.JPG

IMG_5544.JPG
 
Thanks Jabjeep - those pics are actually pretty helpful - and also a bit depressing as they show pretty much the same engine mounting and positioning. I don't know a town about the sbc to t90 adapters - but I am learning a lot the last couple days - and it looks like you have the standard chevy bellhousing with the 2 5/8" adapter between the bell and the T90. In the case of mine - it appears the 57sbc was out of an automatic (according to those that might know - a powerglide) based on the adapter I have in front of the bell housing (between the bell and engine). Then there is an aftermarket (?) bellhousing that was used when adapting a manual trans to an engine that came with the powerglide. And then I have another adapter between the bell and T90 - but its not as thick as the 2 5/8" 'standard' adapter for the sbc bell. But what it all means - the total length of the 2 adapters and the aftermarket bell is the same as the set-up you have - and that both work the with the long 9.25" stickout of the t90J....so my hope that maybe somehow the odd combination of adapters and bell might have opened the door for a short shaft t90 - which would mean I could 'push' the engine forward a couple inches with a long input shaft - isn't going to happen. At some point, I'll have to decide whether it worth trying get the engine placed in a better spot, and then deal with the drivetrain shifting etc....or just leave it as is and deal with the firewall clearance issues.
 
Last edited:
Another little project....The heater core sprung a significant leak a couple weeks ago - I bypassed the core so I could keep puttering around in it, and it looks like its probably been seeping for a long time, and finally went all out.
[IMG]


I ended up having a local shop to replace the heater core - hope it was money well spent. I think the spectre 94478 would work in both the old willys and ecj5s with a bit of minor mods to the heater box....here is the repaired core - looks good from my vantage point (but what do I know):
[IMG]


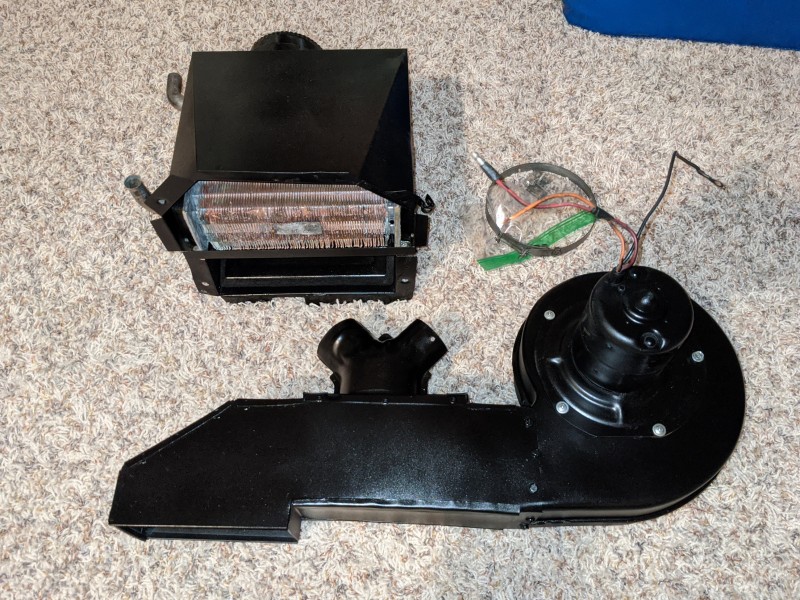
Took the entire heater and blower system apart to clean it and get it functioning just a bit better - guessing from the size of the core and the fresh source is all just like the cj, that this thing is as much a placebo heater as anything, but I'd like it to at least function and look decent. Took it all apart and cleaned however many years of gunk, dirt and whatnot out of and off of everything. The plenum assembly always seemed to rattle around etc - turns out it is probably a homemade replacement for the old cardboard style. Its made out of something like galvanized flashing and riveted together - but it actually seems to be pretty darn solid. The diverter/flapper was and the dual outlet look to be OEM and grafted into the homemade housing.
[IMG]


I think if I would have made one - I would have welded it together from thin sheetmetal as the rivets leave a lot of sharp edges at the overlaps and corners, as well as the seams are not airtight. Wonder how much affect that might have on airflow out the defroster etc. At some point it had been held to the blower housing with a few screws - but most of those where gone and it was barely holding together with some dry rotted duct tape. I attached them together much more solidly with 2 screws on each side, trimmed and worked on fitting the joint together nice and tight, and used a little hammer work to tighten up and smooth over most of the open gaps and rough edges etc. I think it came out pretty darn well.....certainly worth re-using instead of buying the plastic aftermarket ones....The biggest concern is there is there is a bit bigger gap around the diverter (between the diverter flap and the inside of the tunnel) than I would like, so not all of the air will get diverted into the defroster.
[IMG]


The rest of the heater box and housing has also been cleaned up and everything reassembled - there was a lot of rust and corrosion etc, and its not easy to get in all the nooks and crannies, but its also looking really good.
IMG_20200922_093832.jpg


Putting it inside storage for a bit as I think I have a big project coming up with pulling the engine and might as well keep it out of the engine bay.
 
Last edited:
Another project little project I am just about to finish....Replacing the glove box:
I think there is a thread on OWF that discusses different solutions members have done here. This is how I did it with a 50cal ammo can, copying the method I saw a fellow member on the earlycj5.com site use on his ecj5 (he links another thread where he found it): Focker's '71 CJ5 Drivable Build

The wagon doesn't have the support gusset thing he had to cut around, but it turns out the outside rear corner doesn't quite fit and has to be cut down anyway. I used one of the cheap $10 50cal ammo cans from HF. The lid slides right off the hinges and I removed the handle so it wouldn't rattle around when driving. Comparison of the cardboard box (which I would guess is not OEM, but some proper fitting aftermarket replacement) with the ammo can:
[IMG]


Dimensions for the cardboard box is just under 11"x5" for the front opening and 9.5" deep.
as compared to the ammo can at 11"x5.5" for the front opening and 7" deep.
The bottom dash support in the wagon is different than the flat edge in the cj5 - there is actually two lips on the wagon - the OEM box mounts just under the upper lip, and the door hinge mounts on the lower lip. The ammo can fits better on the lower lip, so mounting took a relief cut on the bottom of each side as well as removal of one of the hinges (eventually I removed the next hinge as well to make clearance for the side mounting hole and nut):
[IMG]


And then the outside back corner needed clearance (I was expecting at only 7" deep, I wouldn't run into any interference, but the extra half inch of height and inflexible metal doesn't quite fit):
[IMG]


So that led to the question of whether to leave the corner open or to try and weld in thin sheet metal to keep the box 'enclosed'. I went with the weld in a patch, which was a bit tedious given the how thin the can sides are - maybe 22 gauge? I had some 18 gauge sheet metal I made the patch from, and it was thicker than the ammo can. Even at the lowest setting, it was trying to burn the can away more than weld it. Its not pretty, but it won't be visible once painted and installed....If I did it over again, I probably would skip the patch and just leave the open corner....(or maybe overlap the patch and spot weld it in)....
[IMG]


Need to cut a relief slot for the door hanger - I am using the same bottom mounts as the door hinges use (not the same ones the cardboard box uses), so can test fit that on the bench....
[IMG]
[IMG]
[IMG]


Add a couple holes on the sides - spacer required on one side between the dashboard tab and the inside of the can as the box is just a bit wider than the OEM. To minimize interference with the top of the cowl and to simplify the door hanger hook slot, I chose to push the box to the driver side and put the spacer there.
[IMG]


As the can mounts on the lower frame lip, whereas the OEM box uses the upper lip, there is a bit of dead space back under the upper lip - might eventually fill that with a bit of spongy foam or whatnot to keep things from disappearing under it....
[IMG]


It needs cleaning and painting....but the test fit looks good and its mounted solidly with 2 screws and Keps nuts on the bottom and side each. Going to get some grey paint instead of dark so its easier to see the stuff inside of it.
 
Nice job on the heater restoration! I think you'll find that just that natural effect of the rising heat will compensate for any air leakage to the defroster ducts. It really doesn't take that much air to have keep them dry. Mine doesn't flow much in the delivery, but it's enough to keep the glass clear.
 
The sbc283 in the wagon is quite tired....and while I've got it running reliably (spark and fuel etc), the compression is low and oil consumption is high, as well as leaky gaskets and seals everywhere that I think are mostly due to crankcase pressure (no PCV - just a road draft tube). Anyway, I am happy to keep driving it around town as is - just have to keep up with adding oil every couple fill ups - but also recognize for it to be more than just an around town 'go getter' etc, its going to need some help in the engine dept. So this is the plan:
[IMG]

I do really like some aspects of the 283 - and if it were in good shape, I would have just kept using it. But the 283 is a short stroke, high rpm engine that is pretty gutless below 1500rpm, and doesn't really wake up and pull until 2000rpm. So it just doesn't seem worth putting money into a rebuild of an engine that I didn't think would ever be that great on the low end torque needed for my intended usage or interest. I do worry a 350 could be too much motor, and in a perfect world a 305 or 327 might have been better, but the price and history (hopefully) for this one was right. While the T90 is a potentially a bit weak for a sbc350, the plan is to keep the build completely 1970s oem truck build, and to drive it with awareness. The placement of the engine is not ideal as it uses the front cradle mount on the OEM L6 engine mounts - the engine is crammed up against the firewall. So if/when the transmission needs to get swapped, new engine placement and cross-members can all be done at that time....but I want to do it in small steps with driveable time in between. I think the D18 and D44 should be able to stand up to some use, and the D25 can be babied a bit when in 4wd lo. No intention to put traction devices in the axles, so that also helps keep from abusing them....I will say, I bought this wagon specifically because it already had some swapping and modifications done and thought it would be a more useful driver on a more frequent basis (and I would be more free to modify without regret...but I am also learning that I really do lean more towards stock configuration with limited, purposeful and maybe even subtle upgrades (the cj5 is mostly stock minus lift and tires, and Tera low gears hidden in the D18 and a locker hidden in the D44). I feel like with each discussion of swapping out another piece, I am killing the soul of the wagon....but in the the end, keeping it on the road and driving it lots will hopefully make up for it.
 
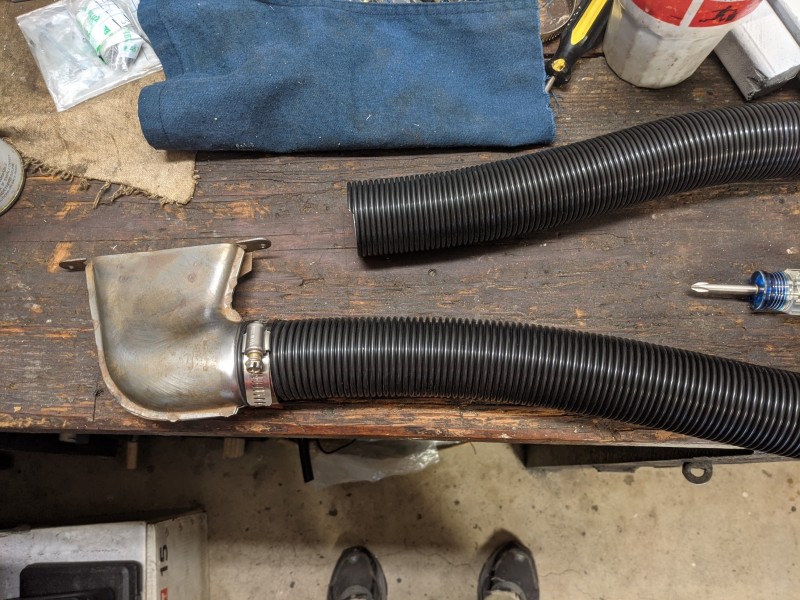
continuing work on the heater box and air controls....new ducting for the defroster...decided it was easier to remove the defroster 'horns' than try and work with them in place up under the dash. And as others have said - I hope there was good reason for the oval shape! Maybe to make room for the wiper cable and pulley system?
PXL_20200927_190325736.jpg
 
The sbc283 in the wagon is quite tired....and while I've got it running reliably (spark and fuel etc), the compression is low and oil consumption is high, as well as leaky gaskets and seals everywhere that I think are mostly due to crankcase pressure (no PCV - just a road draft tube). Anyway, I am happy to keep driving it around town as is - just have to keep up with adding oil every couple fill ups - but also recognize for it to be more than just an around town 'go getter' etc, its going to need some help in the engine dept. So this is the plan:
[IMG]

I do really like some aspects of the 283 - and if it were in good shape, I would have just kept using it. But the 283 is a short stroke, high rpm engine that is pretty gutless below 1500rpm, and doesn't really wake up and pull until 2000rpm. So it just doesn't seem worth putting money into a rebuild of an engine that I didn't think would ever be that great on the low end torque needed for my intended usage or interest. I do worry a 350 could be too much motor, and in a perfect world a 305 or 327 might have been better, but the price and history (hopefully) for this one was right. While the T90 is a potentially a bit weak for a sbc350, the plan is to keep the build completely 1970s oem truck build, and to drive it with awareness. The placement of the engine is not ideal as it uses the front cradle mount on the OEM L6 engine mounts - the engine is crammed up against the firewall. So if/when the transmission needs to get swapped, new engine placement and cross-members can all be done at that time....but I want to do it in small steps with driveable time in between. I think the D18 and D44 should be able to stand up to some use, and the D25 can be babied a bit when in 4wd lo. No intention to put traction devices in the axles, so that also helps keep from abusing them....I will say, I bought this wagon specifically because it already had some swapping and modifications done and thought it would be a more useful driver on a more frequent basis (and I would be more free to modify without regret...but I am also learning that I really do lean more towards stock configuration with limited, purposeful and maybe even subtle upgrades (the cj5 is mostly stock minus lift and tires, and Tera low gears hidden in the D18 and a locker hidden in the D44). I feel like with each discussion of swapping out another piece, I am killing the soul of the wagon....but in the the end, keeping it on the road and driving it lots will hopefully make up for it.

Not the wagon exactly, but am making a bit of progress with the sbc350 that is hopefully going to find its way into the wagon in place of the sbc283....
The hope is just basic disassembly and inspection, cleaning, re-assembly with new seals, gaskets etc...The idea is NOT to go the full rebuild route, as it would then just have been cheaper to buy a crate engine....so we'll see what kind of trouble I have gotten myself into here....I've never done this kind of engine work before.

Got the intake and heads off...no obvious ridge at the top of the cylinders, and no immediately obvious issues with the cylinders that I can see so far.....here are some pictures...
passenger bank:
[IMG]


cylinders 2 and 4:
[IMG]


cylinder 3:
[IMG]


Had a lot of carbon build-up in the heads and valves:
[IMG]


[IMG]


Here was the worst valve in terms of carbon build-up....I think this was #5...
[IMG]


But a lot of cleaning and lapping - I like how the intake valves look, and I think I got the seats looking better. The exhaust seats were better than the intake seats to start, and look pretty good now, but the intake valves are still rough even after a lot of compound work. But at some point, seemed it was as good as it was going to get and decided to test them....hard to see it, but the closest combustion chamber (#2) here is full of water....its not perfectly water tight, but its only a couple seepy 'drips' over 10 min or so...I think (hope) its good enough...
[IMG]


its mostly the #3 cylinder that is a problem in terms of getting decent valve seats. I feel like if I lap them anymore, I am going to cause a problem with the valves themselves. And I would possibly consider new exhaust valves...all the intake valves came out nice. But we are going to go with it as is....cleaned up and ran a tap through all the threads etc, and since I don't like painted gaskets, I am going to try painting as many of the pieces individually as I can each step of the way before assembly.
[IMG]


Finished cleaning, painting and putting the valves and springs back in the heads...guess I could put the rocker arms on now as well, but seems its much easier to access the head bolts for mounting back to the block without them...so about to put these aside for a bit and get the bottom end cleaned up and ready...

I used these umbrella seals for intake valves:
[IMG]


and these for the exhaust valves:
[IMG]


Put o-rings on the second (lower groove) for all the valves, and then put the retainers in the upper groove with the help of a valve spring compressor:
[IMG]


Finished up:
[IMG]


In reality, the heads probably should have had a professional valve job with grinding valve seats etc, and then new valves would have been a good idea, and then its hard to know where to stop, and you end up with a complete rebuild (never a bad idea), but I am going total budget....as I told my friends, I am channeling my rural southern heritage, drinking Budweiser and and slapping this thing back together essentially as is....
 
Don't know if anyone cares much about a stock sbc350 build...but a lot of this is new for me....A shop did a lot of the work on the cj5 v6, but I am trying to do a lot more of it myself this time - albeit somewhat begrudgingly as I was hoping/not expecting to have to do much to this engine to get it ready (we all know how that usually goes). Some of the issues:
Timing chain very loose (and the nylon coated teeth type cam sprocket):
[IMG]

[IMG]


The engine sat for a lot of years, and a couple of the lifters had some corrosion on them - and specifically a #2 lifter was corroded on the bottom where it sits on the camshaft:
[IMG]

[IMG]


so that meant the camshaft came out for inspection...and yes there was some corrosion on the lobe that was in contact with the #2 lifter:
[IMG]


[IMG]


But there was also a very noticeable flatted lobe on the #3 cylinder that may have been responsible for the significant carbon build-up on the valves. Maybe its a bit hard to see in the photo, but the last of the 4 lobes in the pic is the flat one - very easy to see and feel in person.
[IMG]


So, the adventure continues.....
 
Getting to the crank and rods etc....What do you all think of these main bearing caps....they are not perfect, but are they usable? I am on a shoestring budget with this, and not always sure where the line between mandatory and maybe preferable, but not absolutely necessary is....As I posted with the heads that I lapped - nothing about this engine is going to be a 'rebuild' - more like re-assembly. My thoughts were they need to be replaced (and they are only $25 or so from Summit)...but just wondering.....
Front cap:
[IMG]


2nd cap:
[IMG]


3rd - you can also see the grey cleavite fluid on the cap bolts and the unique smell that accompanies it - reminds me of when the 225 v6 died....
[IMG]


4th:
[IMG]


rear cap:
[IMG]
 
So, this is where it stands now - I intend to pull the rod caps and take a look at those. I am concerned about the condition of the rings - more along the lines of broken or damaged rings than just worn rings. I might try to 'feel' by hand how easily the piston slides in the cylinder, but if they will come out easily and not get hung up on any ridge at the top of the cylinder, I'll probably just pull them.

Anyway - I have been thinking I 'might' be willing to take an empty block to a machine shop for tanking (I am also worried about plugged oil galleys) and honing of the cylinders (guess they would also check the deck as well) and have them install new cam bearings....Could then use new rings on the old pistons, re-use the rods etc....Not sure if the crank would get work or not - maybe let the machine shop take a look at that. New rod and main bearing install myself, new cam, lifters and timing kit.....I have some pricing sheets from the machine shop so will work up a cost estimate....Of course, then we are back in the discussion of is it worth it to spend that money on the bottom end with the heads as they are. The only good news, I was able to exchange some avy protection equipment, so that may have just freed up another $270 to spend on this.

Quick machine shop estimate from my reading of the pricing sheet (and I rounded everything up just a bit):
Tank - 100
Hone 8cyl - 160 (the price list only show 'bore and hone' so maybe honing only would be a bit cheaper?
Cam bearing install - 65
plus parts - 20

So that would be $350....

If the additional block work is needed - it gets expensive quickly - which is what happened with the 225 v6:
Crank grind/polish - 150
Deck - 165
Line hone - 250

I think I could live with the $350 amount, and then add new rings, new rod and main bearings, new cam and lifters, new timing kit. It would be over budget on the whole thing, but not by much, and the bottom end would be in really good shape. The avy gear swap could pay for most of this as well.... So, would it be crazy to do this, and use the existing heads as is? Could I run the heads as is, and then replace them in a year or so assuming the finances improve?

And then I went and found this....
https://thecylinderheadshop.com/pro...vy-882-76cc-cylinder-heads-sbc-1986-and-older
Obviously nothing like new aluminum heads, but considering the pair is half the cost of new aluminum ones, or half the cost of machining my existing 882 heads....put all that together, I'd be about $500 over budget, and could deduct the $270 from the avy gear and maybe this could work....
 
Issues at hand;

Flattened cam lobe sends small, hard metal flecks thru oiling system. So, entire oil passages need to be scrubbed and flushed at a minimum.

Cam flecks probably scratched your main and rod bearings along with crank journals. In a pinch, with the proper bearing clearances, you could reuse crank and bearings. Check clearances and polish any nicks out of the journals with fine, fine sandpaper. This is real down and dirty cheap, you understand?

Honing cylinders and reusing pistons depends upon the amount of taper in cylinder walls. If honing makes piston to cylinder clearances exceed specs then buh bye pistons.

Ask machinist about matching honing grit to piston ring material. Different rings require different grits and give different performance. For example, old school cast iron rings seat the quickest but wear out the fastest and offer high drag/friction. Once again, talk to your machinist after he measures the cylinder walls.

Damaged cam lobe means new oil pump. Non-negotiable.

My favorite cam company is Competition Cams. Since you need a cam, lifters and timing chain set call them with all your vehicle info and intended usage and ask for a cam recommendation. They make more than racing cams.

After taking block to a shop and listening to their advice, I'd be surprised if you got out for less than $1300. I'm think bore and hone, grind crank, resize rods, new pistons, etc.

Not trying to be a richard, I've had numerous engines rebuilt. Kinda like kitchen/bath remodeling or paint/bodywork for a classic. Figure what you think it will be and double that number. Best of luck and success to you. On the bright side, you're rebuilding the most popular engine in America. Scads of video and written info on the internet.
 
In a pinch, with the proper bearing clearances, you could reuse crank and bearings. Check clearances and polish any nicks out of the journals with fine, fine sandpaper. This is real down and dirty cheap, you understand?
thanks - its certainly not ideal, but sometimes reality is very budget constrained...

After taking block to a shop and listening to their advice, I'd be surprised if you got out for less than $1300. I'm think bore and hone, grind crank, resize rods, new pistons, etc.
you are probably correct - and therein lies the dilemma: I just don't have the funds for that much expense. And if you are correct in terms of the necessary work - it will be more than that if I use the 225v6 as the comparison from a few years ago. But I did totally waste the bottom end on that one and more parts were needed than normal, as well as parts are more expensive for the 225 than an sbc....So the question becomes, run it as is with new cam, lifters, timing chain ($150 total) and hope the oiling holds out? Maybe I could get shop to boil the block out and put in new cam bearings....I reassemble just as is? Basically, I may just have to risk it as otherwise its just a big paperweight sitting on the stand taking up space in the garage.....But I do think its worth trying to get it to the machine shop to see if the cylinder bores are in good enough condition to get away with just honing and I can re-use most of the internals....its a hope at least....
 
Super cheap...errrrr frugal, is to thoroughly wash block with
dish soap. A designed grease cutter. Just clean your hands with it and you will believe. Remove all the oil galley plugs. Buy a oil galley brush kit. Scrub and rinse all oil galleys and oil journals in the crank.
Decide which rings you want to use. Buy a hone that matches the rings. Hone with ATF just until you see crosshatch lines. Hand polish crank, removing as little as possible. Remember, you will not be able to evenly sand all 360°of crank journals. So, just enough to remove any nicks. Assemble with old bearings. Check clearances with Plastigage. New oil pump, rings, cam, lifters, timing set, etc.

Hope and pray. Light a candle at church. Sacrifice a goat before first startup.

Oh, add break in additive.

Double, double and then check again your static distributor timing. You have any idea how many new cams have been destroyed by wrong ign timing and the engine would not start?

Fill carb via vent tube so literally engine starts on first crank. Hold rpm for 2000 to 2500 for 20-30 minutes. Many cooling systems can't handle that. A box fan in front of the radiator helps.
 
Back
Top