Building Confidence with a 1959 Wagon in Oregon

Hoffy1039

Precision Fit
Jan 31, 2020
673
Roseburg, Oregon
First Name
Doug
Willys Model
  1. Wagon
Willys Year:
  1. 1949
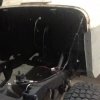
Replaced floor-pan and braces, quarter panels, tailgate and hinge brace, fender panels, lots of tack welding, seam sealing, and primer coating, body is off, starting on mechanical aspects - motor and tranny removed and differing segments ( Body, Frame, Motor, Tranny ) available for individual service jobs while I start on frame cleaning and coating ( as well as body undercoating ). Parts - leaf springs, brake kits, mounts, etc. on order - lots of " little projects " that I can jump around on as time and " parts available " allow. Don't want to jinx myself, but feeling a whole lot more comfortable with this " 1st " time project then when i started!

Lots of great info, ideas and support from this forum. Much appreciated!

59 Willys


IMG_6441.JPGIMG_6829.JPG

Drivers side Qtr panel Installation.JPG IMG_6873.JPG

IMG_6904.JPG IMG_6987.JPG
 
First off, big congratulations to you for tackling the body work.
Secondly, it's good to have multiple projects or tasks on the wagon. Inevitably your progress on one task will be impeded due to paint drying, waiting for parts, waiting for sub-contractors, etc. Having numerous tasks helps maintain momentum during those roadblocks.
 
Believe I am at a milestone moment... body was " solidified ( floor, 1/4 panels/ rear brace/tailgate hinge replaced - rust traced & removed ) , body lifted off frame - take-down & cleaning of frame, motor & axles removed, rust & undercoat treatment.... ready to start " building it back up! Got parts in from Walcks and on order from Willys America - feeling good about future!
IMG_7018.JPGIMG_7023.JPG

Noted after inspection ( and suspicion of a rather extreme impact on front end - different spring, bent tie rod, ) the crack in front frame rail above passenger side spring hanger! Spent a little more time going over the WHOLE FRAME rail mounts and brackets checking! All else appeared A-OK.
IMG_7009.JPG
 
From the factory it was not usual to see a difference of 1/4"-5/16" out of square, so don't be concerned if within that.
Not a lot of quality control back then.
 
Frame has measured square ( within tolerance ), been messing with differentials and knuckles, Kingpins and shims, brakes and drums, waiting for parts to build the frame aspects back up. Just wanted to note that I have used the Xion Lab Rust Converter treatment ( Thats all the red paint ) and am very pleased. Altho it paints on red, appears to be a very good convertor/enscapsolater, easy to apply with brush, abrasive resistant cover, accepts a cover surface ( I used Rustoleum undercoating paint ), and where I welded, it showed no heat affect... period! I am totally impressed with the Xion Lab and Rustroleum combo! This is mostly home shop project, not outsourcing jobs or trying to spend big $ for a beauty queen.
IMG_6909.JPG IMG_6932.JPG IMG_6903.JPGIMG_6931.JPG IMG_7031.JPG IMG_7015.JPG IMG_7023.JPG IMG_7030.JPG

on the other hand, when major projects are on hold, can always spend some time with the finer aspects...

IMG_7111.JPG like sanding the oak rails, just a start on a long process!
 
Spring and shackle hanger bushings...they looked like a problem area, and mine were obviously well worn, bolts worn down and inner bushing tubes were basically gone. Got my parts order in, had read the forum posts about removal attempts, took a hard look at the situation, once again talked myself out of sending the whole thing to the re-cycle scrapper - and just went for it.

IMG_7133.JPG
I noted that socket extension had very near the same diameter as the bushing ( front frame hanger ), a light
grinding around the outside to make sure it was "slightly" less diameter, and then tried the old " BFH " to push the bushing out. Who was I kiddin, Murphy's been my constant partner on this project. Long story short, I wasn't going to spend two weeks getting that bushing hammered, heated, sawed, etc ( as one forum post indicated ). Switched to the " BFD ". Used a 9/16th to drill out the rubber core ( wanted it out to reduce gumming up the Big Bit, which I knew would get a little warm ). After cleared the center, a 7/8th bit drilled out almost all of the bushing, leaving a thin wall within the hanger shaft. I then used the socket extension, and with some moderately light hammer blows, the remaining bushing ' wall " slid out. 5 minute operation. Took me only 3 hours to get the new bushing pressed back in, even after a light surface polishing of the interior facing. The second side got a much more extensive surface " finishing " before pressing that bushing in.

IMG_7131.JPG IMG_7132.JPG IMG_7134.JPG IMG_7135.JPG

IMG_7136.JPG
 
I know I was one of the posters who had trouble with that stupid bushing. Looks like you were able to make it work without a reamer, great work!
 
Well, the next step is the motor, decided that I did not want to tear it down, just do some " maintenance ( carb and fuel pump repair, valves checked and set, pull head and look at pistons), put some "Marvel Oil into cylinders and check leakthru, then make a go at a restart. Well, my neighbor is a retired ASE Mech and prior Willys owner, who was interested in my rebuild and " suggested" ( as long as you have it out - nows the time to make the repairs!!! ) so, down to basics! its now at the machine shop getting"fluxed"... and the rebuild will start if i receive a " clean bill of health!
 
Block went to the machine shop, where I was advised that block was cracked ( #2,3,4 cylinder to valve seat/chambers, beyond reasonable repair )! So currently in the process of looking for a new block, with alternative of dropping in a newer Buick or GM V-6. When purchased, this wagon had almost ALL of its original aspects, I I started my refurbish with the thot of keeping it that way, but I also want a daily runner and a "neat ol rig " to pass down to a grandson, so upgrading to modern engine and some other aspects, Tranny, disc brakes, bucket seats is not beyond my thot processing!

IMG_0186.JPG

In the meantime, axles, brakelines, e-brake, Tranny seals and many other " details have been receiving their due:

IMG_0105.JPG IMG_7112.JPG IMG_7204.JPG

IMG_7224.JPG IMG_7218.JPG Son in law got me the wheels and tires from one of his project suppliers, I still have 4 good original wheels, will see if I stay remod or original---

Body down and back on frame so can conduct some more of the body/interior work! Still working on finding the engine.Son in law ot me the wheels and tires from one of his project suppliers, I still have 4 good original wheels, will see if I stay remod or original---

IMG_7321.JPG IMG_7331.JPG IMG_7329.JPG

Gonna try some sound deadening ideas - closed cell foam pads to walls and roof, and the dreaded wiring harness...

IMG_7326.JPG IMG_7333.JPG IMG_0201.JPG

I'm gettin there!
 

Attachments

  • IMG_0201.JPG
    IMG_0201.JPG
    119.6 KB · Views: 14
Still lookin for my replacement engine/block, meantime doing the detail work on body that can be done. Whatever happens, this is going to be a " driver ', not for show. Gave it an "Earl Shribe " rattle-can paint job - not spending $ where not needed. Put in front 3pt seatbelts, have main and rear wiring harness in and ready to connect. Rear tail, stop, and turn signals good.

IMG_7337.JPG IMG_7348.JPG IMG_7345.JPG

Gettin There!
 
Back
Top