BETTY LOU WAS NEW IN '62

Hey Lance, you're certainly moving along nicely on your restoration. When you get your body cart finished please post a couple pics of it. I'm in the middle of a (off topic) 57 Chevy build and I'm at the point where I also need to construct a cart.
 
Hey Lance, you're certainly moving along nicely on your restoration. When you get your body cart finished please post a couple pics of it. I'm in the middle of a (off topic) 57 Chevy build and I'm at the point where I also need to construct a cart.
Happy to do so. Photos will be posted when I get it done. I use 6 or 8 inch solid rubber treaded wheels, about 14.00 each from Northern tool. 2 that are steering type, 2 non. 2x8 wood for the base, and 4x4's for the uprights.
 
CHEMISTRY EXPERIMENT
As we were disassembling the engine bolt-ons for a good cleaning, it was obvious that the engine was run with WATER, not anti-freeze. The result is lots of flaky rust in the head and block. I plugged up the heater inlet in the head, the water pump opening in the front of the block with rubber sheeting under the pump mounting plate, and made a plate of 3/16" steel, with a male Milton fitting, for the water outlet on the front of the head. I filled the block with fresh water, removed the petcock on the starter side of the engine and blew air into it though the Milton fitting. A shower of rusty water shot out of the block drain hole like a geyser. This convinced me that further action was needed. I bought a gallon of "KRUD KUTTER" rust remover. I had seen tests of it on You tube, with seemingly good results. I replaced the block drain petcock and filled the block to the very top, it took exactly one gallon. I covered the head opening and now we wait, 24 hours is the suggested interval. The active ingredient is Phosphoric Acid, the same chemical used for preserving raw steel after media blasting. Normally, it keeps rust away for a few months.
We'll see tomorrow if I have a clean, or cleaner block.

Willys, krud kutter 001A.jpg
 
CHEMISTRY EXPERIMENT
As we were disassembling the engine bolt-ons for a good cleaning, it was obvious that the engine was run with WATER, not anti-freeze. The result is lots of flaky rust in the head and block. I plugged up the heater inlet in the head, the water pump opening in the front of the block with rubber sheeting under the pump mounting plate, and made a plate of 3/16" steel, with a male Milton fitting, for the water outlet on the front of the head. I filled the block with fresh water, removed the petcock on the starter side of the engine and blew air into it though the Milton fitting. A shower of rusty water shot out of the block drain hole like a geyser. This convinced me that further action was needed. I bought a gallon of "KRUD KUTTER" rust remover. I had seen tests of it on You tube, with seemingly good results. I replaced the block drain petcock and filled the block to the very top, it took exactly one gallon. I covered the head opening and now we wait, 24 hours is the suggested interval. The active ingredient is Phosphoric Acid, the same chemical used for preserving raw steel after media blasting. Normally, it keeps rust away for a few months.
We'll see tomorrow if I have a clean, or cleaner block.

View attachment 56710
Thanks for your excellent documentation of your build. I always look forward to your posts.
 
THANK YOU RON!
A very warm thank you to Ron, aka/ Oruna1 here on the forum. he saw my build blog and offered the use of a special set of dies he made to straighten the mouldings. you simply pout the dented portion of the moulding into the 2 halves of the die, place in a vise and tighten, The dies push the dents out! Amazing and fast. View attachment 56314
I'd like to see it in operation! Thanks for sharing!
 
TIME TO UNCORK
24 hours were up. I removed the rubber covering the water neck and looked down into the head. The wash seemed to have worked. The visible rust under the water neck was gone. We placed a big steel tub under the engine and removed the covering on the head and opened the water drain cock. The tub filled with brown gunk. Several flushings later, the water was running clear. The Krud Kutter seemed to have worked, at least somewhat. What was formerly hard rust, was now either gone of gooey glop. We decided to button it up and try again. A second gallon of the solution was added and we waited another day. Today, we opened it up again, and more brown gunk ran out. Feeling brave, we started to remove the Welch plugs, ( freeze out plugs). Now, it was clear where all the rust had gone, down the side of the cooling jacket. Behind the plugs was caked solid with gooey rusted particles. An hour with engine brushes in all the reachable places and lots of flushings, and even high pressure air, cleaned out the block pretty well. Using a thin air tube, I was able to get it down behind each plug's opening and force the crap out and up, what a mess. Rusty crap shot all over everything in sight. A few more flushings with water and it's ready for the final cleaning step. I'm going to use our pressure washers "spinning nozzle" and stick it in each Welch plugs hole as a final step. All in all, very messy, but well worth it. I don't see how the engine would have run without the cleaning, little or no water would have circulated.
 

Attachments

  • Willys, Jan.20 001.JPG
    Willys, Jan.20 001.JPG
    282.7 KB · Views: 107
  • Willys, Jan.20 002.JPG
    Willys, Jan.20 002.JPG
    247 KB · Views: 107
  • Willys, Jan.20 004.JPG
    Willys, Jan.20 004.JPG
    241.8 KB · Views: 105
  • Willys, Jan.21 001.JPG
    Willys, Jan.21 001.JPG
    283.4 KB · Views: 104
  • Willys, Jan.21 002.JPG
    Willys, Jan.21 002.JPG
    275.3 KB · Views: 106
Tuesday
Not a lot to report today, one final flush of the block, ran nice and clear. Finally removed the last Welch plug, The rear-most one was like paper, so thin it collapsed when hit. I would up carefully sawing it to the edge of the hole in the block and was able to get a grab on the rim with a Steck rod. On a positive note, I found my serial number on the frame, it's still readable. Located on the right frame horn, just in front of the cross member, and it matches the VIN plate! Hooray.
Tomorrow, we start cleaning and reconditioning small pieces and hopefully getting the body mount bolts out, in anticipation of lifting the body off the frame.
Gotta play carpenter then, and build another body cart.
 
Gotta play carpenter then, and build another body cart.

I don't know about anyone else, but I wouldn't mind if you had a mini-build thread for the body cart construction in here. Could be useful for those who may not be particularly handy with woodworking.
 
SEPERATIONS ARE DIFFICULT
But, with a bit of work, doable. We made sure that all the body mount bolts were out, ( forgot the 2 rear-most ones first time.)
Set the lift under the body, avoiding the soft spots. Really didn't want to see the lift arm poking through the floor while lifting.
We got it about 6 inches off chassis and had to roll the chassis forward a bit for the shift sticks to clear their hole in the floor.
After lots of trepidation, and blocking with wooden blocks, to make sure it was basically level, she came off without a hitch! Hooray!
Now, the fun part starts, scraping the greasy crud off everything, so the frame can be powder coated. I have a feeling that the springs will be a PITA. They look really rusted on the shackles. Sent the manifold out to be Cera-coated, and made a list of what we don't have. Walcks will be smiling again!Willys, jan.28 005.JPG
 

Attachments

  • Willys, jan.28 003.JPG
    Willys, jan.28 003.JPG
    251.1 KB · Views: 87
  • Willys, jan.28 004.JPG
    Willys, jan.28 004.JPG
    245.4 KB · Views: 86
  • Willys, jan.28 006.JPG
    Willys, jan.28 006.JPG
    151.2 KB · Views: 85
  • Willys, jan.28 007.JPG
    Willys, jan.28 007.JPG
    282.5 KB · Views: 86
  • Willys, jan.28 008.JPG
    Willys, jan.28 008.JPG
    230.8 KB · Views: 87
A Beautiful day.
Wow, yesterday was 14* Today, 53... We decided that this was the ideal day to do the final cleaning of the now separated chassis and body. The crud was layered on the engine and tranny. The more we washed, the more layers of crud came off. Finally, we could see metal! The engine was red(once.) It was amazing how much grease was on the tranny and D18, literally no detail could be seen, only a lump of metal. Using the most powerful nozzle, we stuck it in every opening that we could. All freeze out plug holes, the front of the water jacket, and the block drain hole. Amazing how much dissolved rust flushed out, a veritable river of red ran down our parking lot to the drain. I guess the Krud Kutter really worked. Now, I have to arrange for a sand blaster to come and do the body in prep for it going to my metal guys shop to get the rot fixed and ready for paint. At this time, I sort of leaning towards a dark Lincoln silver-grey and Ford white. Having some time after the washing, we started to media strip and etch prime small parts. We sorted them all out and into tubs according to their place on the truck. Tomorrow, I think I'll tackle building a good distributor out of 5 crappy ones I have. By the weekend, I hope to have a cart built for the body and one at least started for the chassis. Then, it's off to the powder coaters shop to do the chassis a nice semi-gloss black.
 

Attachments

  • Willys, Feb.2 003.JPG
    Willys, Feb.2 003.JPG
    263.3 KB · Views: 85
  • Willys, Feb.2 005.JPG
    Willys, Feb.2 005.JPG
    224.5 KB · Views: 85
  • Willys, Feb.2 006.JPG
    Willys, Feb.2 006.JPG
    142.7 KB · Views: 88
  • Willys, Feb.2 007.JPG
    Willys, Feb.2 007.JPG
    197.3 KB · Views: 91
  • Willys, Feb.3 001.JPG
    Willys, Feb.3 001.JPG
    342.9 KB · Views: 91
  • Willys, Feb.3 009.JPG
    Willys, Feb.3 009.JPG
    285.7 KB · Views: 91
  • Willys, Feb.3 012.JPG
    Willys, Feb.3 012.JPG
    260.1 KB · Views: 89
  • Willys, Feb.3 013.JPG
    Willys, Feb.3 013.JPG
    277.4 KB · Views: 88
Closer we get . . .
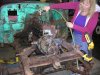
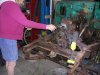
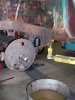
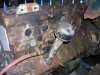
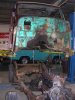
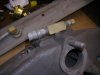
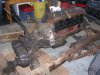
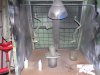
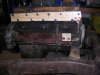
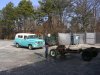
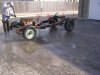
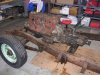
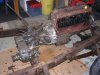
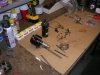
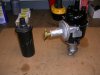
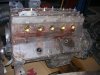
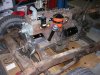
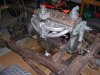
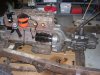
it's been a few days since my last posting. lousy winter cold has kept me, (and now my wife) down for a while. But, feeling better, it's time to get Betty Lou back in gear. The dizzy that came with the engine was crap, so, using my junk box of many distributors, I was able to piece a really nice one together. The rough cleaning of the block is done, so it's time to reassemble the add-ons and see if she runs as well as the initial tests indicate it should. I have 40lbs of oil pressure cranking the engine! No perceptible slack in timing chain, and no end movement of the crank. Certainly, if all goes well, we will tear it all down gain, reclean and paint everything as it should be. I got the wood for the 2 carts and with luck, this coming weekend will be woodwork time. I got the manifolds back from the Cera-coat guy, and as you can see, some of the accessory items are back on. Tomorrow should be the test day! Hooray. I do know that the clutch is toast, coated with oil. Apparently, the rear main leaks badly. The underside of the truck is coated with gunky, muddy goo. I decided to use brass freeze plugs, they seem to seal better than the steel ones, will never rust out, and only cost about a quarter more each.
 

Attachments

  • Willys, Feb. 11 002.JPG
    Willys, Feb. 11 002.JPG
    204.4 KB · Views: 79
  • Willys, Feb.17 001.JPG
    Willys, Feb.17 001.JPG
    161.3 KB · Views: 80
  • Willys, Feb.17 002.JPG
    Willys, Feb.17 002.JPG
    192.5 KB · Views: 79
  • Willys, Feb.17 003.JPG
    Willys, Feb.17 003.JPG
    261.9 KB · Views: 80
  • Willys, Feb.17 004.JPG
    Willys, Feb.17 004.JPG
    230.6 KB · Views: 83
  • Willys, Feb.17 005.JPG
    Willys, Feb.17 005.JPG
    253.4 KB · Views: 82
Back
Top