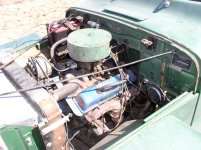
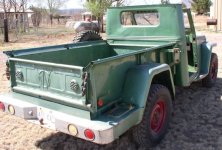
52 P/U repowered & restored

BioTex

Sharpest Tool
Nov 15, 2009
224
Alpine, TX
Willys Model
Willys Year:
I started with these two trucks:
 

Attachments

  • 1952-Willys.jpg
    1952-Willys.jpg
    28.3 KB · Views: 961
  • Driver-Side.jpg
    Driver-Side.jpg
    54.2 KB · Views: 956
  • Engine.jpg
    Engine.jpg
    172.2 KB · Views: 958
The upcoming challenge is to take the 52 frame, and build up to a complete truck.
At this time I estimated $3,000 to $4000 should see me through.
 

Attachments

  • Firewall.jpg
    Firewall.jpg
    68.1 KB · Views: 942
  • R-RearQuarter.jpg
    R-RearQuarter.jpg
    64.3 KB · Views: 946
Ok, so let's get started on the dissasembly.

Good news is I don't need to purchase adaptors.
 

Attachments

  • Willys-Rebuild-001.jpg
    Willys-Rebuild-001.jpg
    97.1 KB · Views: 943
  • 52-Willys-Rebuild-(8).jpg
    52-Willys-Rebuild-(8).jpg
    108.4 KB · Views: 945
  • Copy-of-Removing-parts-003.jpg
    Copy-of-Removing-parts-003.jpg
    82.8 KB · Views: 950
I will use the front and rear axles from the 1950 truck. They came out of an old Gladiator when the PO installed the SBC.
 

Attachments

  • Removing-parts-001.jpg
    Removing-parts-001.jpg
    79.4 KB · Views: 949
  • Engine-out-of-frame.jpg
    Engine-out-of-frame.jpg
    81.6 KB · Views: 948
  • Removing-parts-009.jpg
    Removing-parts-009.jpg
    74.4 KB · Views: 946
Sandblasting the frame.
 

Attachments

  • 52-Willys-Rebuild-(4).jpg
    52-Willys-Rebuild-(4).jpg
    110.9 KB · Views: 942
  • Sandblasting.jpg
    Sandblasting.jpg
    84 KB · Views: 941
  • Willys-Frame-Sandblast-003.jpg
    Willys-Frame-Sandblast-003.jpg
    187.7 KB · Views: 944
Look at all that space available in your shop, can I bring my '62 Wagon over? Keep taking pic's and posting, we all can learn and get ideas...thanks!
 
By sandblasting the metal, it is considered properly prepared. The next step is to seal it with an Epoxy Primer/sealer.
 

Attachments

  • Sandblasted-cab-001.jpg
    Sandblasted-cab-001.jpg
    83.1 KB · Views: 934
  • Sandblasted-cab-002.jpg
    Sandblasted-cab-002.jpg
    64.3 KB · Views: 934
I built a frame rotating machine so I could paint it without having to spray upside down.

The green primer is a self etching primer from Dupont.
 

Attachments

  • Frame-Machine-003.jpg
    Frame-Machine-003.jpg
    106.8 KB · Views: 934
After etching the frame, I sprayed Rustbullet on it. It is similar to POR-15, except it can handle the UV rays better. It can be topcoated also, and it is cheaper. I'm sold on it.
 

Attachments

  • Frame-with-Rustbullet-001.jpg
    Frame-with-Rustbullet-001.jpg
    77.4 KB · Views: 933
Your cheating, I see an assistant caveman...I will have to google Rustbullet and find out more about it...POR15 is good stuff - but pricey...However, slow down, I can't keep up to you. I found some IH Scout II front disc and rear drum axles for $350.00 I bought today...3.08 ratio....getting rid of my Dana 27 - 4.28...with overdrive...to many levers.
 
62 OlllO said:
Your cheating, I see an assistant caveman...I will have to google Rustbullet and find out more about it...POR15 is good stuff - but pricey...However, slow down, I can't keep up to you. I found some IH Scout II front disc and rear drum axles for $350.00 I bought today...3.08 ratio....getting rid of my Dana 27 - 4.28...with overdrive...to many levers.

I want an overdrive... Just can't afford one.
 
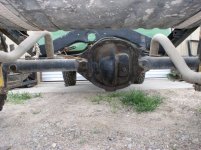
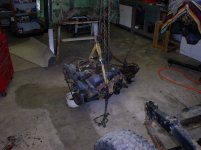
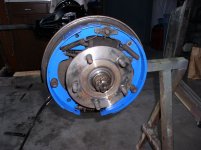
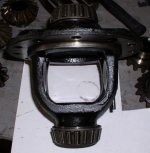
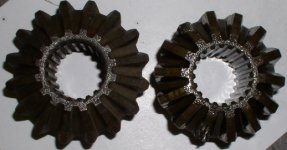
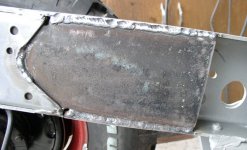
I inspected the rear end, and found the spyder gears had some teeth broken off. It was fun trying to find a set of gears.
I replaced the bearings and seals while I had it apart. I installed the new pinion seal backwards, so I had to order a new one and replace it again.
 

Attachments

  • Dana-53-002.jpg
    Dana-53-002.jpg
    45.2 KB · Views: 29
  • Dana-53-004.jpg
    Dana-53-004.jpg
    69.1 KB · Views: 29
  • Spider-gears-002.jpg
    Spider-gears-002.jpg
    41.6 KB · Views: 28
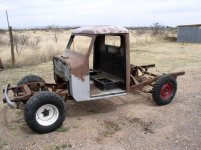
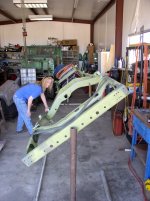
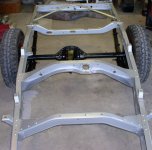
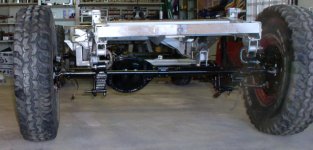
I installed the axles onto the frame for a rolling chasis.
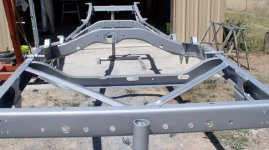
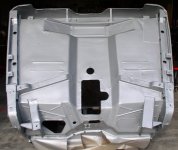
Next, I added the 21 gal. fuel tank. It is also painted with Rustbullet. I have the original tank, but it is just too small.
 

Attachments

  • Reassembly-010.jpg
    Reassembly-010.jpg
    46.4 KB · Views: 36
  • Reassembly-001.jpg
    Reassembly-001.jpg
    61.3 KB · Views: 34
  • Front-Axle-002.jpg
    Front-Axle-002.jpg
    50.7 KB · Views: 35
Beefed up the frame where the new motor mounts will go.
 

Attachments

  • Motor-mounts-001.jpg
    Motor-mounts-001.jpg
    102 KB · Views: 31
Rustbullet on the underside of the cab, and on the firewall.
 

Attachments

  • Underside-of-Cab.jpg
    Underside-of-Cab.jpg
    116.2 KB · Views: 36
Sprayed primer on the firewall after welding up all the extra holes.
 

Attachments

  • Primerer-firewall.jpg
    Primerer-firewall.jpg
    69.7 KB · Views: 30
Back
Top