Nicolsons 1961 Willys Wagon

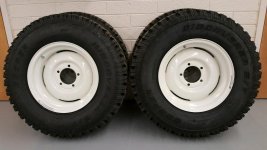
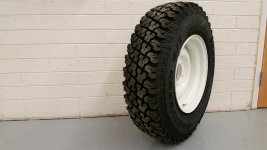
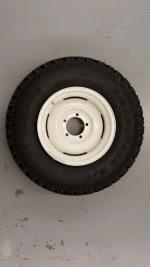
Today I picked up my wheels. They really did a nice job of mounting and balancing them. Even though the tires are mounted on a wider rim they really do not look much different than a 7.50 16 mounted on a 4.5” rim. Which is fine because that is kind of the look that I was going for. When I was unloading them I thought that the powder coat had been marred during the tire installation. But then I wiped it with my thumb and the marks came right off. No scratches or blemishes.
 

Attachments

  • 20180105_165223.jpg
    20180105_165223.jpg
    45 KB · Views: 52
  • 20180105_165410.jpg
    20180105_165410.jpg
    43.8 KB · Views: 57
  • 20180105_174309.jpg
    20180105_174309.jpg
    29.7 KB · Views: 48
I don't know why they are lasting so long... I just liked the tread pattern and thought I give them a try.. Bridgestones
tires wore the best on the big trucks I used to work with... And the Desert Dualers used on our pickups lasted forever.
Like over 100K some times... So I gave these a try... And yes they are quiet and smooth... I don't drive thru sharp
rocks though...The sidewalls are probably just like a car tire, I'd guess.........

Your new tires and rims look great.......
 
Last edited:
In 1966, I worked in the garage @ LAPD.. We used Cooper tires on the regular black and whites... A 7.00x15 tire cost the
Department $10.72.. I had to charge out every tire I mounted so I remember the cost... Cooper made an inexpensive
high quality tire.........The freeway cruisers (Oldsmobiles) used very expensive Goodyears on special 7" rims....
It was a great time to be young........
 
Last edited:
great looking wheels and tire combo. I like that "throw back/OG" type look
 
wellll, could be, at least I find as I get older, I like older simple things. My other play car is a 74 VW Thing (aside from my brother's project 47 Willys truck), no power or boost assisted brakes, no power steering, no ac, cable clutch, drum brakes, all metal dash and no computer.....
 
When I mounted my 283 into my wagon I fabricated a cradle. A cross member that mimicked a GM truck frame to mount the engine. One of my reasons was that I felt it would add structural rigidity to the frame. I spent several days fabricating and installing this mount. It worked well. Solid, no doubt added the rigidity I thought it would. Looked good. I HATE IT. It is something that I wish that I would have run through the forum before I started. I looked at pictures on the internet at stock engine bays. I noticed that Willys used a biscuit mount much like Ford in the early days and used by many hot rod enthusiast. I read through the Novak site and found a very well written article over re powering Willys wagons. https://www.novak-adapt.com/knowled...s/chevy-buick-gm/utility-trucks-wagons-swaps/ They listed many reasons why they felt that a cradle was a poor choice for a wagon repower. Every reason listed was dead on. So taking a step back I will remount my 283.
 

Attachments

  • DSCF1163.JPG
    DSCF1163.JPG
    66.6 KB · Views: 29
Over the last 2 days I built some frame mounts and part of the wing assemblies to be used in remounting my 283. Again the Novak site was very helpful. I looked at their Legacy System but wanted to build my own mounts in order to make the installation looking as stock as possible. After studying various biscuit mounts. I bought some biscuits from Summit Racing. They came with the biscuits, cups, and bolts. Looking at my frame I could see that Willys kept it simple. So I followed suit. The wings are not finished yet. I left them long and will trim them to length after I mock up the assembly.
 

Attachments

  • mm31.jpg
    mm31.jpg
    19.3 KB · Views: 34
  • 20180107_154819.jpg
    20180107_154819.jpg
    65.7 KB · Views: 29
  • 20180107_154829.jpg
    20180107_154829.jpg
    70.1 KB · Views: 28
  • 20180107_154659.jpg
    20180107_154659.jpg
    56.2 KB · Views: 29
  • 20180107_154939.jpg
    20180107_154939.jpg
    52.4 KB · Views: 28
  • 20180107_130758.jpg
    20180107_130758.jpg
    58.6 KB · Views: 31
  • 20180107_153154.jpg
    20180107_153154.jpg
    53.4 KB · Views: 33
  • 20180107_155324.jpg
    20180107_155324.jpg
    40 KB · Views: 32
  • 20180107_155419.jpg
    20180107_155419.jpg
    48.8 KB · Views: 31
This is a better picture of the biscuit mount installed on a wagon with a SBC. Taken from the Novak site.
 

Attachments

  • mm29_drivers_side_bracket.jpg
    mm29_drivers_side_bracket.jpg
    15.2 KB · Views: 39
Today after work I fabricated some motor mount flanges that will be welded to the wings. I used a plasma cutter to cut the flanges and then an iron man to punch the bolt holes. I copied the shape of the GM motor mounts. I like using the punch for holes but this could be done with a drill press as well. I have to admit the big hole in the middle was only because the GM mount had one.
 

Attachments

  • 20180111_094819.jpg
    20180111_094819.jpg
    39 KB · Views: 33
  • 20180112_164148.jpg
    20180112_164148.jpg
    50.1 KB · Views: 33
  • 20180112_164112.jpg
    20180112_164112.jpg
    46.7 KB · Views: 37
  • 20180112_165541.jpg
    20180112_165541.jpg
    48.3 KB · Views: 35
  • 20180112_165729.jpg
    20180112_165729.jpg
    44.9 KB · Views: 33
Last edited:
Been reading through your thread, Keith, and am enjoying the progress you have made. Nice to have the plasma cutter and some of the other tools at your disposal, not to mention the ability to use them. I envy you! Most of my stuff is typical garage/hand-held tools. Your build is adding to my eagerness to work on mine, though. Keep up the good work!
~Bruce
 
Thanks 48wagonguy. There are so many people on this forum with such a wide range of talent. I enjoy reading through builder’s threads as well. I know what you mean by being inspired by the progress of others. The Moab reunion really gets me going. When I was adding to my thread the other night my wife looked at me and asked what I was doing. When I told her I could see her eyes start to glaze over. She looked at me and stated “Well I am glad you have someone to share it with”.
 
LOL! I know exactly what you mean, wife-wise. My wife lets me buy whatever I want, tho I'm not sure she really understands a lot of it. My 36 year old son is always involved, tho, so that makes it easier for her to agree. I am also inspired by Moab. Never been there, and want to attend the reunion one year. Maybe we'll see one another out there!
~Bruce
 
I had to chuckle a little. Reading the beginning of my build thread I was going to keep this project as simple as possible. Well I think we are past that now. And gaining momentum. I pulled out the drive train and removed the cradle that I had built and installed. Found some frame damage that will have to be addressed. Back in my thread I was talking with Pivnic about being a little disappointed that the previous owners had cut up the firewall pretty bad. Here I have removed the original firewall and am going to transplant a donor firewall from my parts truck.
 

Attachments

  • 20180115_170923.jpg
    20180115_170923.jpg
    57.4 KB · Views: 53
  • 20180115_170840.jpg
    20180115_170840.jpg
    55.2 KB · Views: 57
I have been looking for some wagon replacement parts. My gas tank was hurt pretty badly by some sort of impact. For some reason I was missing one rear hatch prop assembly. I have to thank Casey Dimmitt (Dimmwatt) for sending replacements from his collection.
 
When looking at my frame I noticed that running fuel and brake lines around the frame perches would be difficult. The lines would have to be routed up and over or down and under. Instead I grafted a chase into the mount to allow the lines to run behind the mount in their original location.
 

Attachments

  • 20180121_143718.jpg
    20180121_143718.jpg
    62.4 KB · Views: 23
  • 20180121_152419.jpg
    20180121_152419.jpg
    47.9 KB · Views: 23
  • 20180121_182537.jpg
    20180121_182537.jpg
    59.6 KB · Views: 24
  • 20180130_161424.jpg
    20180130_161424.jpg
    35.3 KB · Views: 25
I have an opportunity to have my doors media blasted. I started to take them apart but when I came to removing these cats’ whiskers I could not figure out how to remove them. Is there anyone that can lend some advice?
 

Attachments

  • 20180208_172140.jpg
    20180208_172140.jpg
    55.1 KB · Views: 30
  • 20180208_172144.jpg
    20180208_172144.jpg
    29 KB · Views: 31
  • 20180208_172149.jpg
    20180208_172149.jpg
    33.2 KB · Views: 29
Back
Top