Ramblin' Rose - 1963 Willys Pickup

justwondering

Precision Fit
Sep 11, 2016
528
Northeast in the Republic of Texas
First Name
bekasu
Willys Model
  1. Pickup
Willys Year:
  1. 1963
Saving the forum entries for specific questions... let me introduce my first Willy's Build (officially)

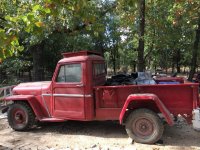
Please welcome -- Ramblin Rose...
IMG_5442.jpg At the barn she was in for 9 years or so.

IMG_5602.jpg IMG_5603.jpg IMG_5604.jpg IMG_5605.jpg
On the trailer arrival at her new home
 
This 1963 pickup was originally light green, but someone painted her red (looks like they used a paint brush to do it).
The cow catcher, roof rack, rear bumper hitch were welded on by the previous owner. Not pretty, but apparently did the job.

IMG_5630.jpg Last inspection sticker when they still required them in the window.
IMG_5608.jpg Yes, there is a solid plate welded into the bed.
IMG_5610.jpg Diamond plate (1 foot by 1 foot) welded on top of each rear fender.
IMG_5611.jpg Where the spare goes, but I don't get how the wheel stays.
IMG_5612.jpgOh so attractive plate welded to the roof.
 
Interior:
IMG_5613.jpg driver's side door panel. Passenger side looks about the same. Dang the glass is cracked.

IMG_5614.jpg Not the original steering column/wheel. Looks like they butchered the front plate to put in a radio.

IMG_5615.jpg Yep, its a Buick.

IMG_5616.jpg Junk in the seat came free. Looks like an aftermarket seat cover.

IMG_5618.jpg Ceiling is bare. Gotta love the dirt dobber nests everywhere.

IMG_5619.jpg Technically, the driver side visor is there.

IMG_5620.jpgFoot pedals under the steering column. They look original. Very cute and round.

IMG_5621.jpg The totally nasty rubber mat and you can see daylight through the hole on the floor. So I surmise, this was once a manual and is now automatic.

IMG_5622.jpg The dash. Glove box is there and not butchered.

IMG_5623.jpgKeys dangling in the dash.
 
Last edited:
IMG_5625.jpg Front window.

IMG_5626.jpg Rear Window. Gun rack stays.
IMG_5627.jpgUnder the seat plate.
IMG_5628.jpgSo I'm guessing the red bracket is for the missing side mirror. What is the round, silver bling for?

IMG_5629.jpg Front window from the outside.

IMG_5631.jpgUgly cowcatcher. Guess I'm glad its on there because it protected the grill.

IMG_5632.jpg Front of the hood. Garnish in pretty good shape.
 
Engine:
IMG_5633.jpg Not too bad shape, but that battery needs to go.
IMG_5634.jpg Left side.

IMG_5635.jpg Rear firewall. Now why did they paint this thing that ugly red?

IMG_5636.jpg
IMG_5637.jpg
IMG_5638.jpg
IMG_5639.jpg
IMG_5641.jpg Why is there only 1 belt? Looks like the pulley can handle 2.

IMG_5642.jpg
IMG_5643.jpg
 
Welcome from Colorado, Bekasu. Your "new' find looks to be in fairly good condition. It also looks like there was another Willys Pickup in that barn. Was that for sale too? The Farm must have used "Rambling Rose" to Round Up the Cattle with that giant "Cow Catcher" on the front! If only that old truck could talk! Nice pictures you took. I'm glad to see that you took a picture of the truck when you first saw it in it's original spot! Keep posting pics of your Build Progress. Pivnic
 
'My Fair Lady'. Absolutely gorgeous under all that work related accessorizing.
 
Both the Willys pickups were purchased and moved off the estate first thing.
I still need to go back next week and retrieve the Willys Wagon carcass. I was going to leave it, but based on comments here I should go ahead and bring it home as well just in case there are parts I can use. It seems a bit too rusted to save, but then I'm not the expert on old wagons.

IMG_5762.jpgIMG_5763.jpg has no engine, no seats.. I wonder if the engine was actually pulled for use in Ramblin Rose?
 
the more times i look at these pics. the more i am falling in love with that cattle guard and roof rack.
 
Oh lord Bryce ...
That cow catcher is just a pickle for me.
I'm thinking I need a winch and front hitch on it so maybe I just modify it for those items, or maybe I take it off and replace, or maybe I get a portable unit I add when I need it so the weight distribution isn't hosed 100% of the time.
Maybe I just need to focus on round tires for now...
 
After I got 2 more cords of wood chainsawed and replaced the sway bar links and sway bar bushings on the Silverado, I had time to look over Ramblin Rose.

I found my 'lost' 4 way wrench.
Took the jack over to the Rose.

Found the 'L' on each of the studs on the driver side. Absolutely wonderful - righty loosey, lefty tighty on that side.
I have all the lugs on the front loose.

Now I get down to figure out where to put the jack and I'm perplexed.

Very novice question, where do I put the jack that doesn't muck up something else?
I tried to place it under the springs but there are two rather long threads/bolts with nuts where I would normally put the jack.

I tried jacking under the cross frame, just behind the front bumper but -- not enough throw on my floor jack or on the bottle jack.
Since the bumper is even higher, I know that won't work either.

So she asked very politely 'whats the best location to jack up the front tires?'

My thought here is to take the tires off and air them up, put them back on the pickup and see if they hold air.
Ditto on the rears.
If they all hold air, I can push this puppy over to my favorite shade tree for further review on Monday.
 
Last edited:
You'll chuckle when you go to thread those left hand lugs back on, by hand, to get them started for the wenching. It's... well, awkward.
 
After watching tons of videos on the web I can better describe my concern.

New cars have obvious specific lift points on the outside edge of the body. Trucks usually I lift at the tow hooks and he have more under carriage structure

Older cars have a frame construction that is noticeably different. There are no obvious points on the body edge to use

My idea of lifting at the front would work if I had a huge floor jack. So I'm thinking I should build up a platform to put my smaller jack on since I don't have enough throw
Or
Add a pad at the top and lift it at the axle near the backside of the wheel
Or
Go get the tractor and use the bucket under the bumper
 
Big fat zero on Rose today. Sigh.
I started the day replacing the power brake booster in the 1987 Chrysler Fifth Avenue.
Took over 4 hours for me to finally get it out of the car.
Why?
I have no idea what I'm doing and am trying to follow the directions in the service manual.
Rotating the linkage ... what? I rotated all over the place and no budging.

Pivot the linkage ... now that would have made sense to my brain.

I'm just going to have to blame this on brain mapping. Mine is very, very different that whomever wrote the service manual.

Course, I had to lay on my back on the front seat, scooch over until my head was under the left side of the dash and work left handed (I'm right hand dominant), busting 4 nuts loose off the studs at the firewall. It was probably pretty funny if you were watching... I'd have to get out and walk around ever once in a while to get the blood to quit rushing to my head .... lol

Ah well, tomorrow is another day.

Its quite a distance to a town that has stores open on Sunday, so I drove an extra 45 miles to get the 1 dang 3/4 inch cotter pin I needed. Splurged and drove to the fabric store to look at fabric. Monday, I start the reinstall... should go faster.
 
I feel your pain, Bekasu. You sometimes have to turn yourself into a pretzel to get things done under the dash. Gets harder to do the older you get. Can be frustrating, but all worth it in the end. Keep plugging away:]
 
i use a floor jack. on the axle. blocks of wood under the jack if needed. cheater bar on jack handle if needed also. 1 side at a time.
 
This morning I finished installing the new power brake booster in the Chrysler Fifth Avenue.
That means the Chrysler moved from the 'critical care' work area over to the 'recovery' work area.

Ramblin Rose was moved to the 'critical care' work area under my favorite shade tree.

Here we go...
I decided to try airing up all the tires to see if they would hold long enough to get Rose over to the shade tree.
Three held air.
I did have a spare with belts showing on the sidewalls. Aired it up and it held.

Take the old tire off - driver side - right to get it off -- opposite thread!
IMG_6136.jpg

Used the tractor to lift the rear end.

IMG_6137.jpg

The tire had two holes all the way through so it wouldn't hold air.
You can see one of the cracks here.
IMG_6138.jpg

And the other crack here:

IMG_6139.jpg

Looked fine unless the weight of the truck was on it, then it was flat.
 
Have not removed the rat pellets yet. It was sitting too far from the electricity or the water.


Reeked, but I got in to do the steering.
Column turns and it steers ... I didn't try the brakes. I did put the shifter in neutral.


At first we tried pushing it. But dragging it with a chain behind the tractor worked better.
Lovely view out the front.
I noticed the window is cracked.
The glass has red drips of paint on it.
IMG_6142.jpg

This is a shot from the rear, in my critical car slot. I don't have granite pieces under the truck
but they surround the truck. Thats another project for another, cooler, day.

IMG_6143.jpg


Here is Rose sitting in the critical care slot.

IMG_6145.jpg

I do apologize for the attachments being out of order. We started having a rain storm in the middle of this post and I can't alter it the way I want to.
Lets just continue on the journey!
 

Attachments

  • IMG_6141.jpg
    IMG_6141.jpg
    79 KB · Views: 49
  • IMG_6144.jpg
    IMG_6144.jpg
    144.3 KB · Views: 47
Last edited:
Back
Top