Knock Knock. Who’s There?

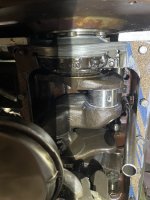
I had a thought while away from the Willys work that I might be able to take the 3/8” rope and stretch it in order to get it thinner so it might fit. When pulling on a new piece I pulled out a white cord or core from the center of the sleeve. First tried to reinsert it but that wasn’t happening. Then tried it without the cord. It packed in the groove and had a much better fit. Used a 2 1/2” dia. slug to contour the shape and further push it into the groove. After doing this ,it seemed to look like it might work. I cut the ends for length with the hot razor blade,lubed the exposed seal and the groove with assambly grease.
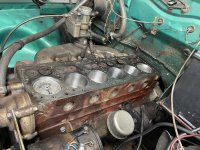
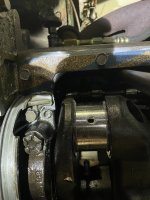
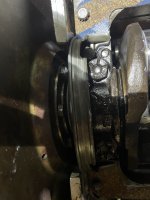
Got under the wagon and after a bit got the top filler block started in the groove. After awhile and turning the engine I got the top half of the filler block in place. It seemed to be tight enough and wiped the crank seal surface as it should. The seal stayed in place and I could see that the hot blade faced off the ends of the rope seal very well. Haven’t yet tried the bottom half but think it is a go. Worst that can happen is it will leak !
 
Finally got back at it after sourcing parts. Honed the bores with first a stone hone (as recommended through a video recommended on the forum). Then finished up with a 260 ball hone. Still some very slight ridge but it is what it is. Had issues with the bottom oil ring from Hastings. It was too tight in the groove. Couldn’t return them at this point so I lap them over glass to get the required clearance and now feel right. Replace the rod bearings with standard bearings. ( old bearings were .0015 new are .001) Might only mean a tad more oil pressure but wanted new. Waiting on head bolts and .60 flat washers. Won’t be long now.
 
Time allowed me to finish assembly of the 226 and the start up. After some smoke and steam it sounds good. I Let it warm up to temp and so far no noise. I’m along way from signing off on the job at least until I take it for a ride and get some miles on those rings.
So I honed the cylinders,replaced the rings,replaced the rod bearings and resurfaced the head. If the noise is gone I can only think it was the broken ring on #6. Thanks for all the information and technical help for the forum members.
 
I will post what I have Randy. It has been along time since I had the internals of an engine apart and had forgot some important things. Some came back to me and the forum reminded me of others. Simple parts were tougher than I thought and machine work here in the Northeast has a long wait time.
 
This is all I have Randy. Not sure if any will help you but incase.
 

Attachments

  • IMG_3657.png
    IMG_3657.png
    819.2 KB · Views: 17
  • IMG_3669.png
    IMG_3669.png
    179.5 KB · Views: 16
  • IMG_2115.jpeg
    IMG_2115.jpeg
    174.9 KB · Views: 17
  • IMG_2121.jpeg
    IMG_2121.jpeg
    292.1 KB · Views: 16
  • IMG_2125.jpeg
    IMG_2125.jpeg
    197.2 KB · Views: 16
  • IMG_2126.jpeg
    IMG_2126.jpeg
    191.7 KB · Views: 14
  • IMG_2127.jpeg
    IMG_2127.jpeg
    164.2 KB · Views: 15
That rope seal info should be very helpful for me very soon. Thanks!
I haven’t ran my engine long enough to tell but as of now my seal is dry. I wasn’t sure what seal to use regarding the size. It was clear that the ones I bought in the Fel Pro overhaul set and the ones that were sent from an other vender were the same and didn’t fit. Way too thick. I found material on the internet that may have fit ( bought in small roles) but wasn’t sure if it was 5/16 I needed or 1/4” but I was sure that the 3/8” was too fat. Anyway I thought that I might try the 3/8” that I had that had a cord in the center and wanted to see how it fit without the cord so I tried it. It seemed to be just right. Hard to get the top half in the block but was in full contact with the crank so I tried the bottom and it to seemed like it might work. So far it has. Time will tell.
 
Back
Top